222. DNS in kubernetes

선수 지식

얼추 배울거

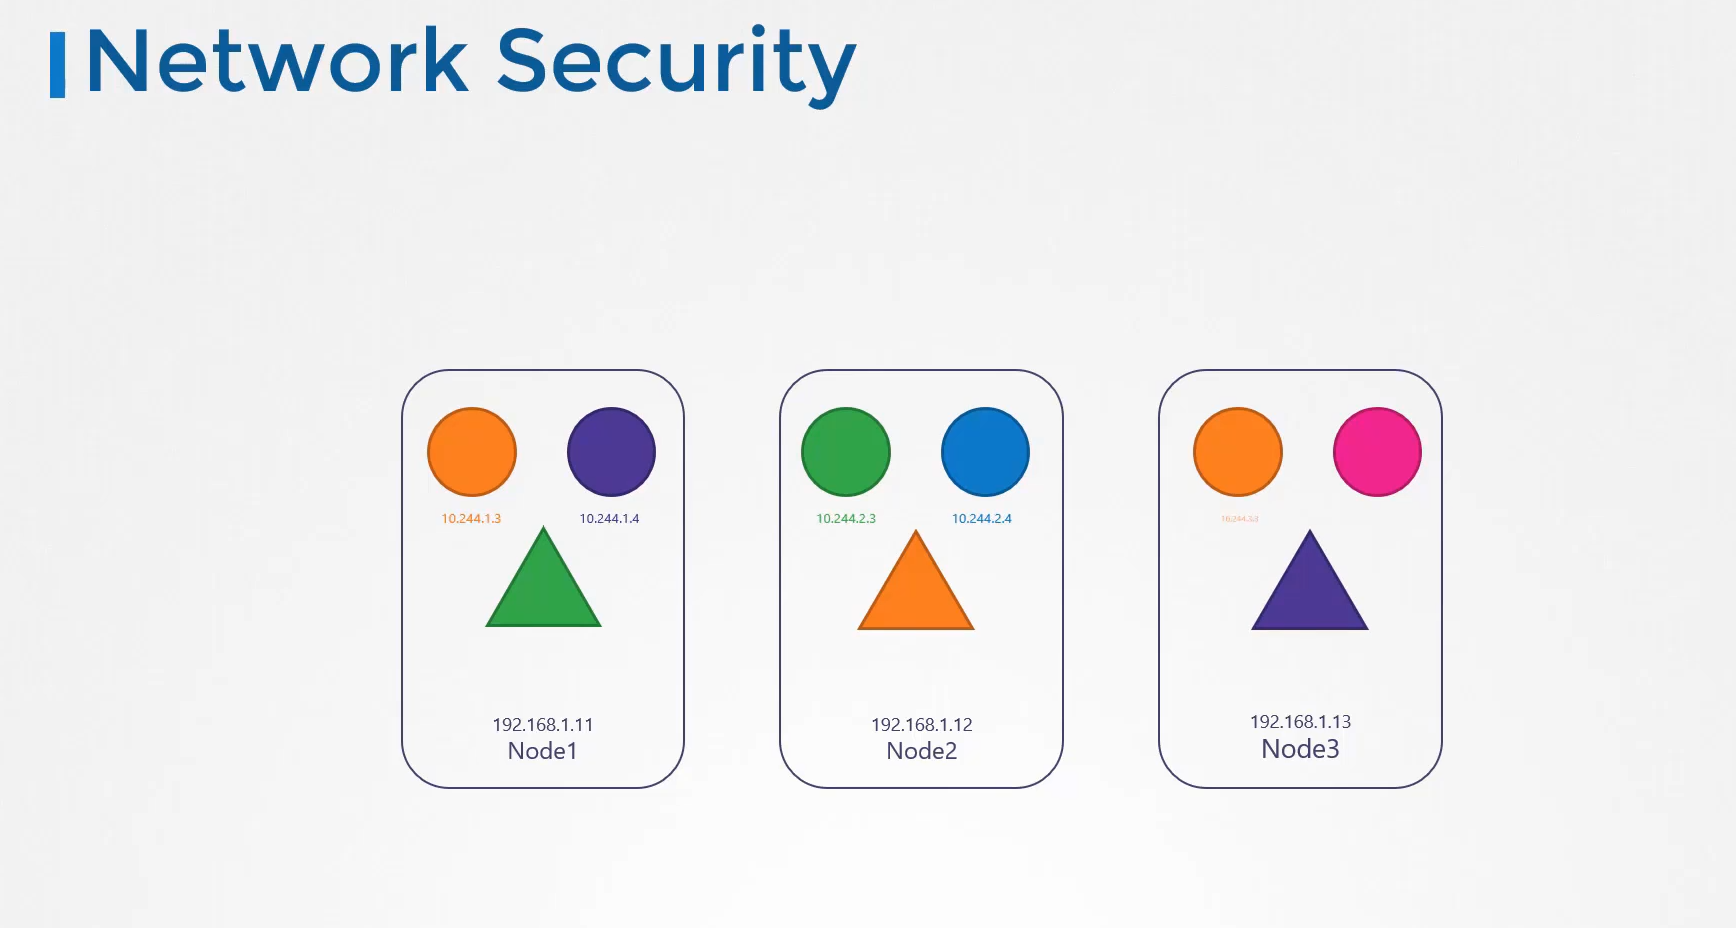
노드에는 파드와 서비스가 있고 각자 노드는 이름과 ip를 가지고 있다.

노드이름과 ip를 등록한 dns 가 있다.

그거와 별개로 쿠버네티스는 기본적으로 클러스터단에 실행되는 dns가 있다.

이해를 돕기 위해 노드는 신경 쓰지 않고 파드, 서비스 dns 에 집중해보자!

파드 두개와 서비스가 하나 있다.
test 와 web
web-service 라는 서비스를 만들었다.
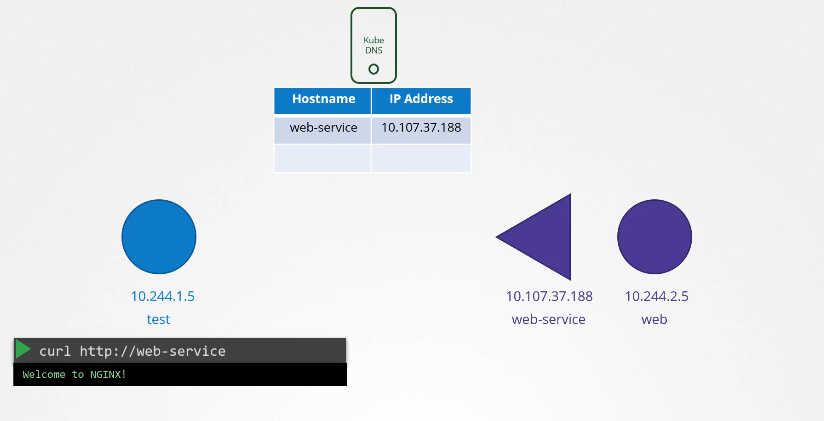
서비스가 생성되면 쿠버네티스 dns 서비스가 레코드를 생성한다.
curl http://web-service 로 test에서 web으로 접속 가능하다.

네임스페이스 처럼

test, web-service 파드 모두 같은 네임스페이스 디폴트 네임스페이스에 존재한다,
test에서 web-service로 web에 접속할 수 있다.

default 와 apps 로 분리되어있다고 가정해보자

url 을 사용할때 네임스페이스 정보도 같이 기입해야한다.
web-service.apps

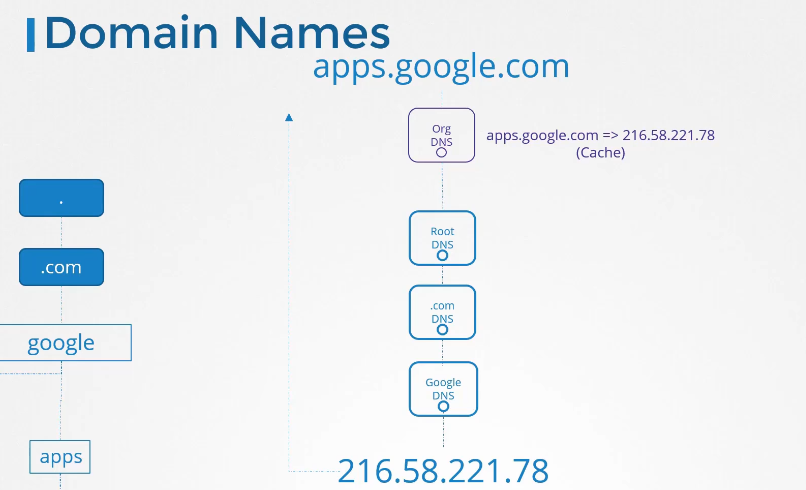
도메인 네임을 자세히 보면

호스트 네임, 네임스페이스 , 타입이 들어간다.
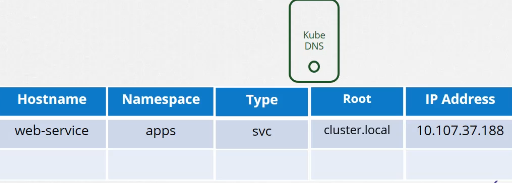
마지막으로 어느 클러스터에 포함되는지 root 정보가 필요하다.
cluster.local 이 루트 도메인이다.

최종적으로
web-service.apps.svc.cluster.local 이런식으로 사용 가능하다.

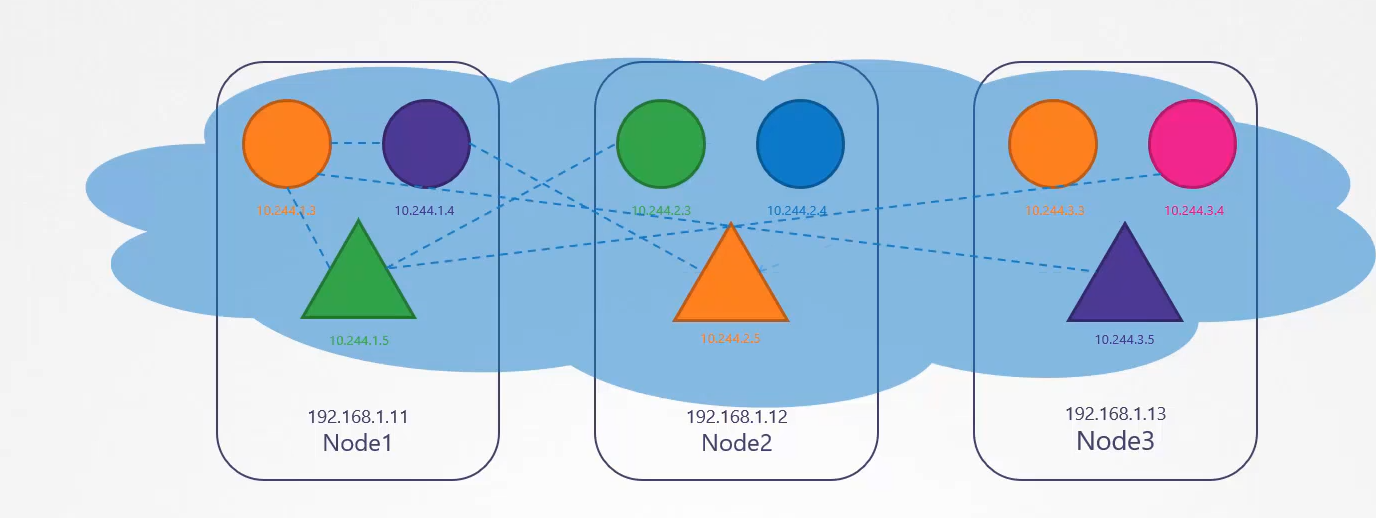
파드의 경우 ip가 .에서 - 로 변경된다.
10.244.2.5 가 10-244-2-5 가 된다.


다른 네임스페이스에 있다면

네임스페이스가 달라진다.
223. CoreDNS in Kubernetes

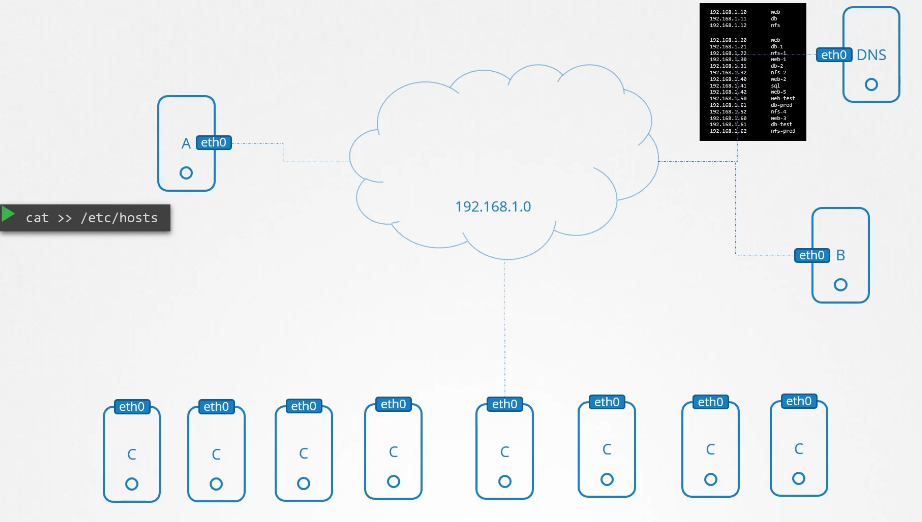
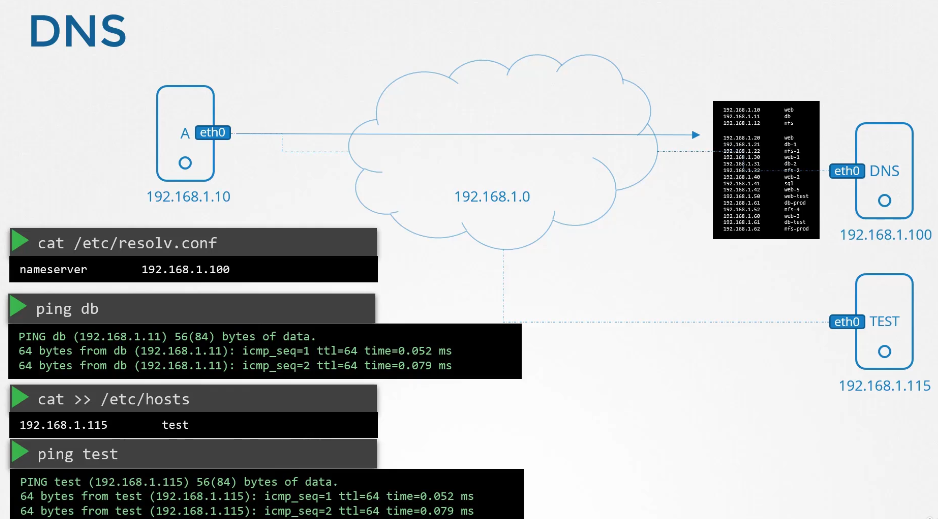
ip를 갖는 파드 2개가 있다.

파드의 etc/hosts 파일을 보면 도메인 네임이 등록되어있다.

파드가 많아지면 /etc/hosts 폴더에 등록하는 것도 불가능하니까 dns에 등록한다.

etc/resolve.conf 파일에 네임 서버를 등록한다.

파드가 등록될때마다 dns 등록함으로서 도메인 네임으로 접속 가능하게 한다.

쿠버네티스에서 dns는 이름으로 저장하는 것이 아닌 .을 -로 표현해서 저장한다.

10-244-2-5
CoreDNS
쿠버네티스에서 coredns 가 도와준다.

이중화를 위해 레플리카셋에 두개 파드로 구현된다. ( 디플로이먼트 안에 레플리카셋)

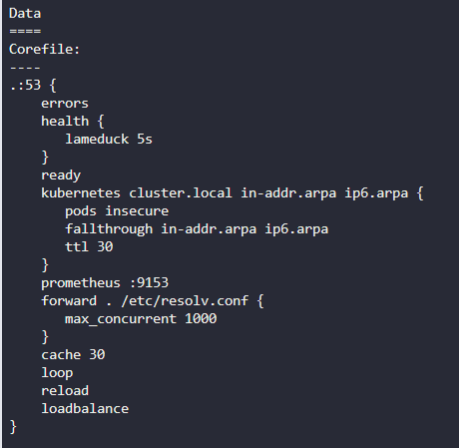
coreDNS는 corefile 이라는 구성 파일을 필요로 한다.
/etc/coreDNS/Corefile

에러를 담당하는 여러 플러그인이 존재한다,

kubernetes 부분에 탑레벨 도메인이 들어간다. cluster.local

configmap 으로도 coredns는 존재한다.

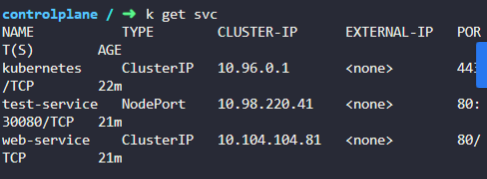
coredns는 kube-dns 라는 서비스와도 연결되어 있어 클러스터내에서 사용가능하다.
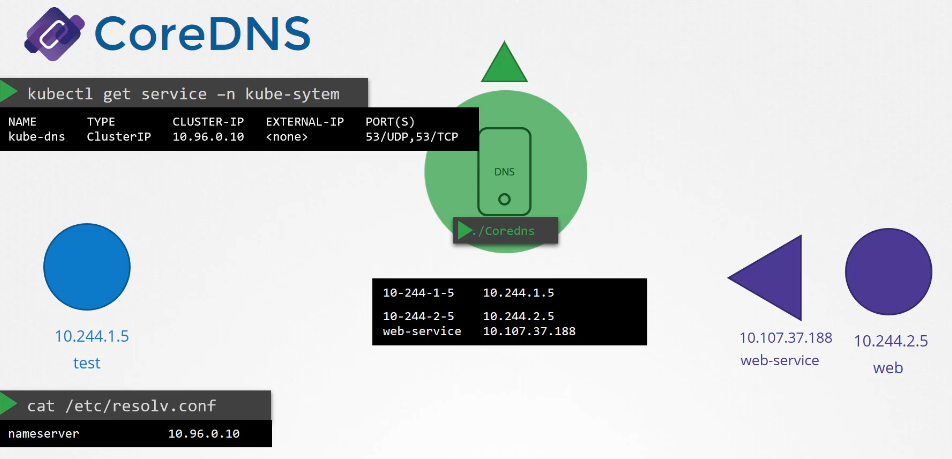
파드의 네임서버를 등록할때 이 서비스 ip를 등록한다.
kube-dns 10.96.0.10

var/lib/kubelet/config.yaml 파일을 통해서 dns의 ip 와 도메인을 확인할 수 있다.

이제 파드에서 모두 사용가능

host 명령으로 도메인 확인 가능

resolv.conf 파일에 온갖 이름이 다 있다.
224. Practice Test - Explore DNS
1. Identify the DNS solution implemented in this cluster

coreDNS 를 사용
2. How many pods of the DNS Server are deployed?
2개
3. What is the name of the service created for accessing CoreDNS?

kube-dns
4. what is the IP of the CoreDNS server that should be configured on PODs to resolve services?
서비스 클러스터 ip 10.96.0.10
5. where is the configuration file located for configuring the CoreDNS service?

deployments 를 통해 확인
/etc/coredns/Corefile
6. How is the Corefile passed into the CoreDNS POD?
pulled from git
Stored on the kube master
Configured as a ConfigMap object
Corefile comes built-in with CoreDNS pod
config map

config map 형식으로 넘겨진다.
7. what is the name of the ConfigMap object created for corefile?

coredns
8. what is the root domain/zone configured for this kubernetes cluster?

cluster.local
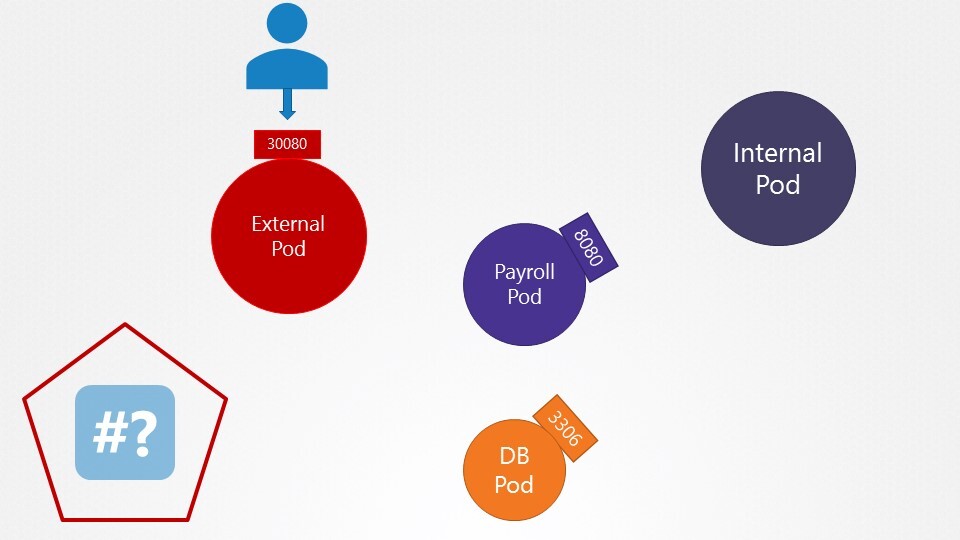
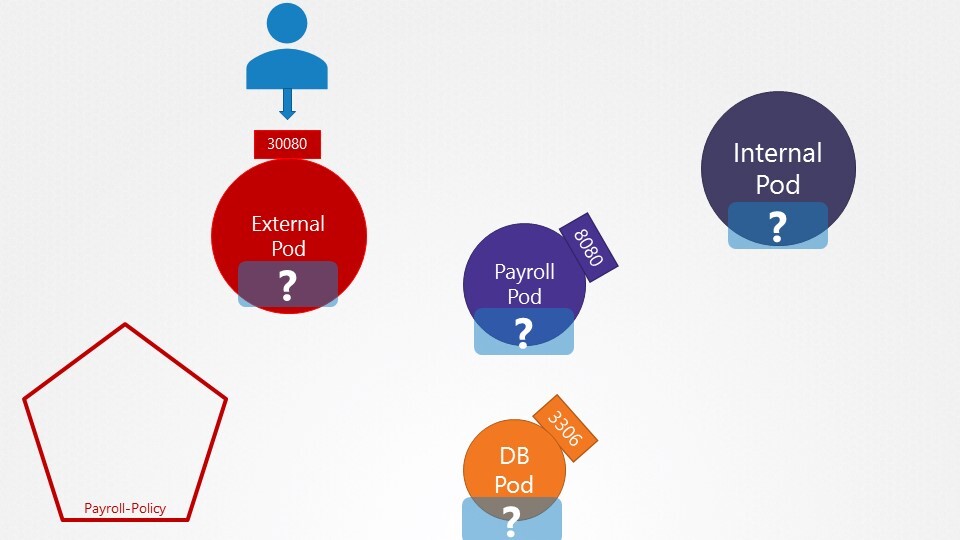
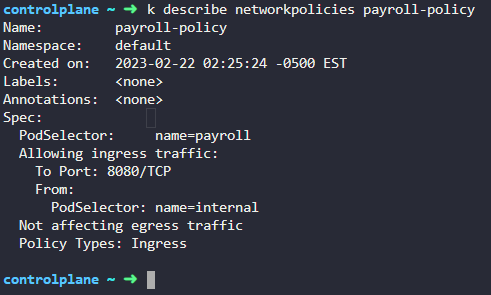
9. we have deployed a set of PODs and Services in the default and payroll namespaces. Inspect them and go to the next question.'
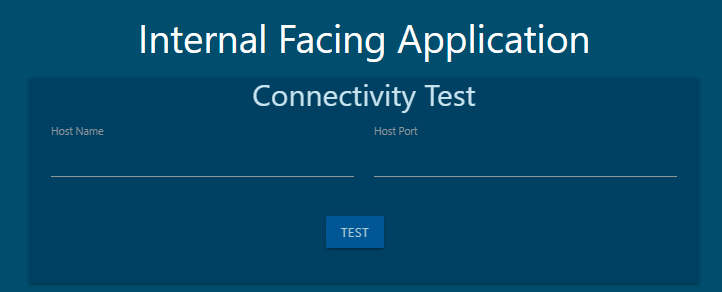
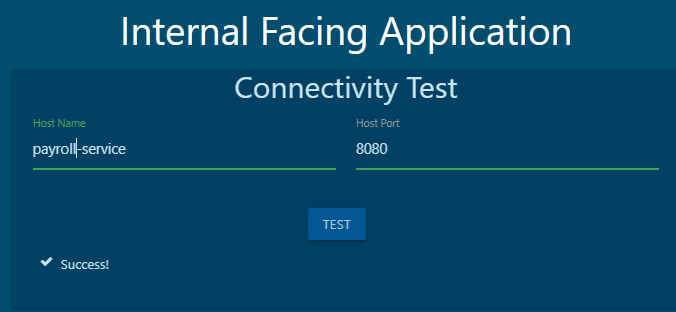
10. What name can be used to access the hr web server from the test Application?
You can execute a curl command on the test pod to test. Alternatively, the test Application also has a UI. Access it using the tab at the top of your terminal named test-app.


web-service 로 접속
11. which of the names CANNOT be used to access the HR service from the test pod?
web-service.default
web-service.default.pod
web-service.default.svc
web-service
web-service.default.pod 안됨
12. Which of the below name can be used to access the payroll service from the test application?


web-service.payroll
13. Which of the below name CANNOT be used to access the payroll service from the test application?
web-service.payroll.svc
web-service.payroll.svc.cluster.local
web-service.payroll.svc.cluster
web-service.payroll

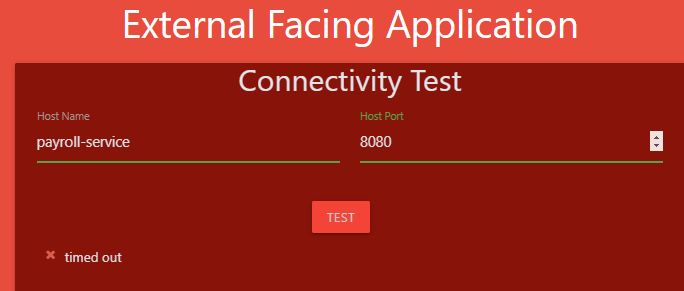
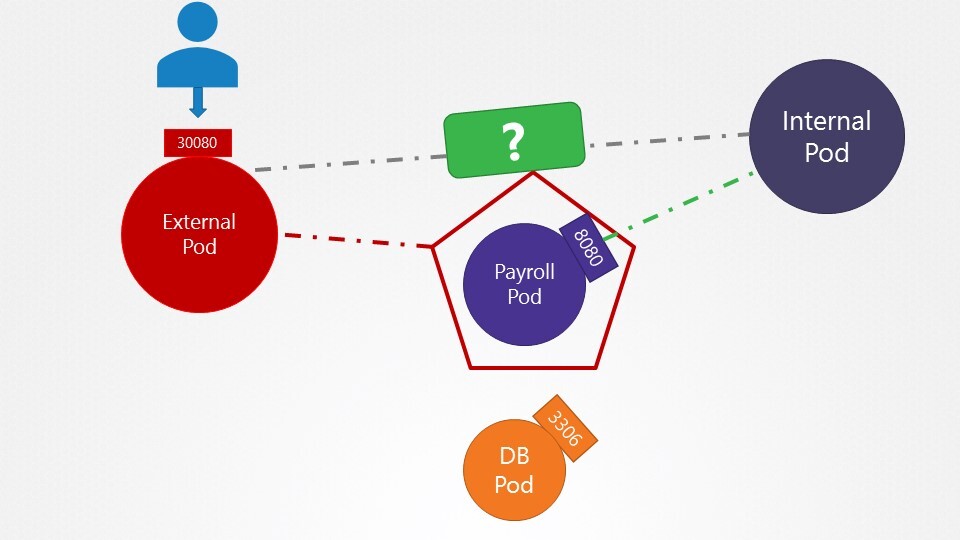
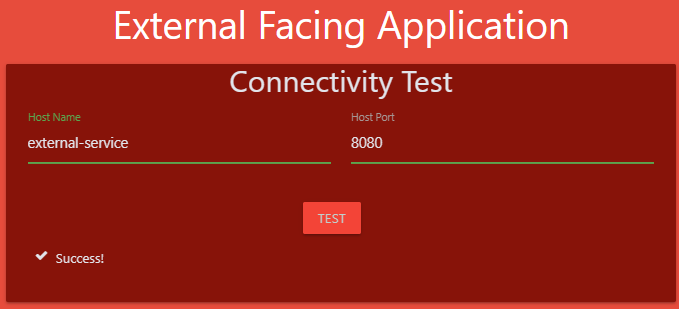
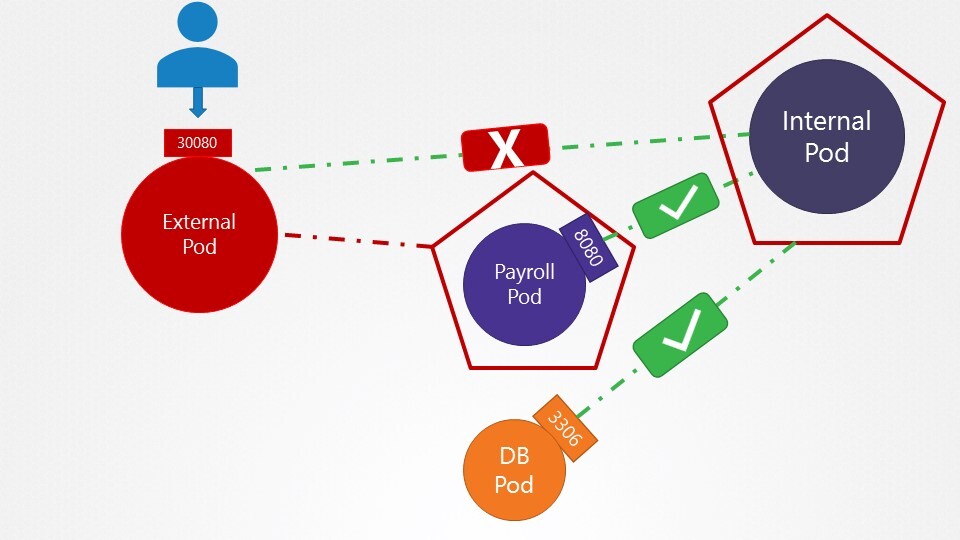
14.
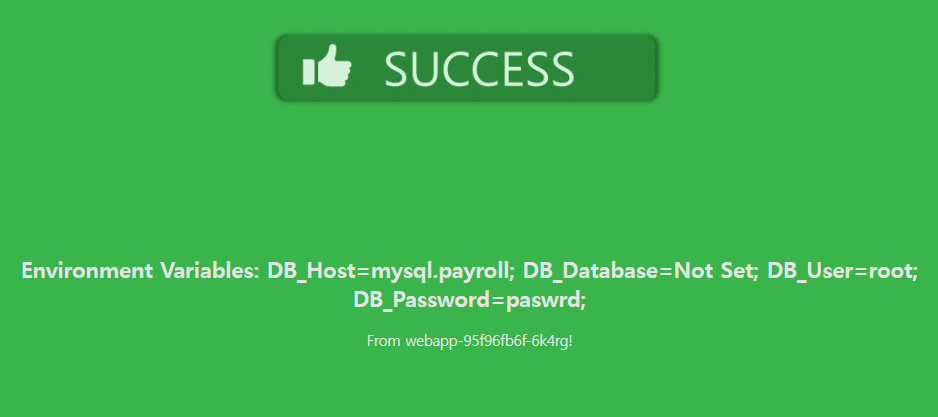
We just deployed a web server - webapp - that accesses a database mysql - server. However the web server is failing to connect to the database server. Troubleshoot and fix the issue.
They could be in different namespaces. First locate the applications. The web server interface can be seen by clicking the tab Web Server at the top of your terminal.


호스트 네임을 변경한다. mysql.payroll

그냥 서비스

payroll 네임스페이스에는 mysql 이 존재한다.
15. From the hr pod nslookup the mysql service and redirect the output to a file /root/CKA/nslookup.out

kubectl exec -it hr -- nslookup mysql.payroll > /root/CKA/nslookup.out
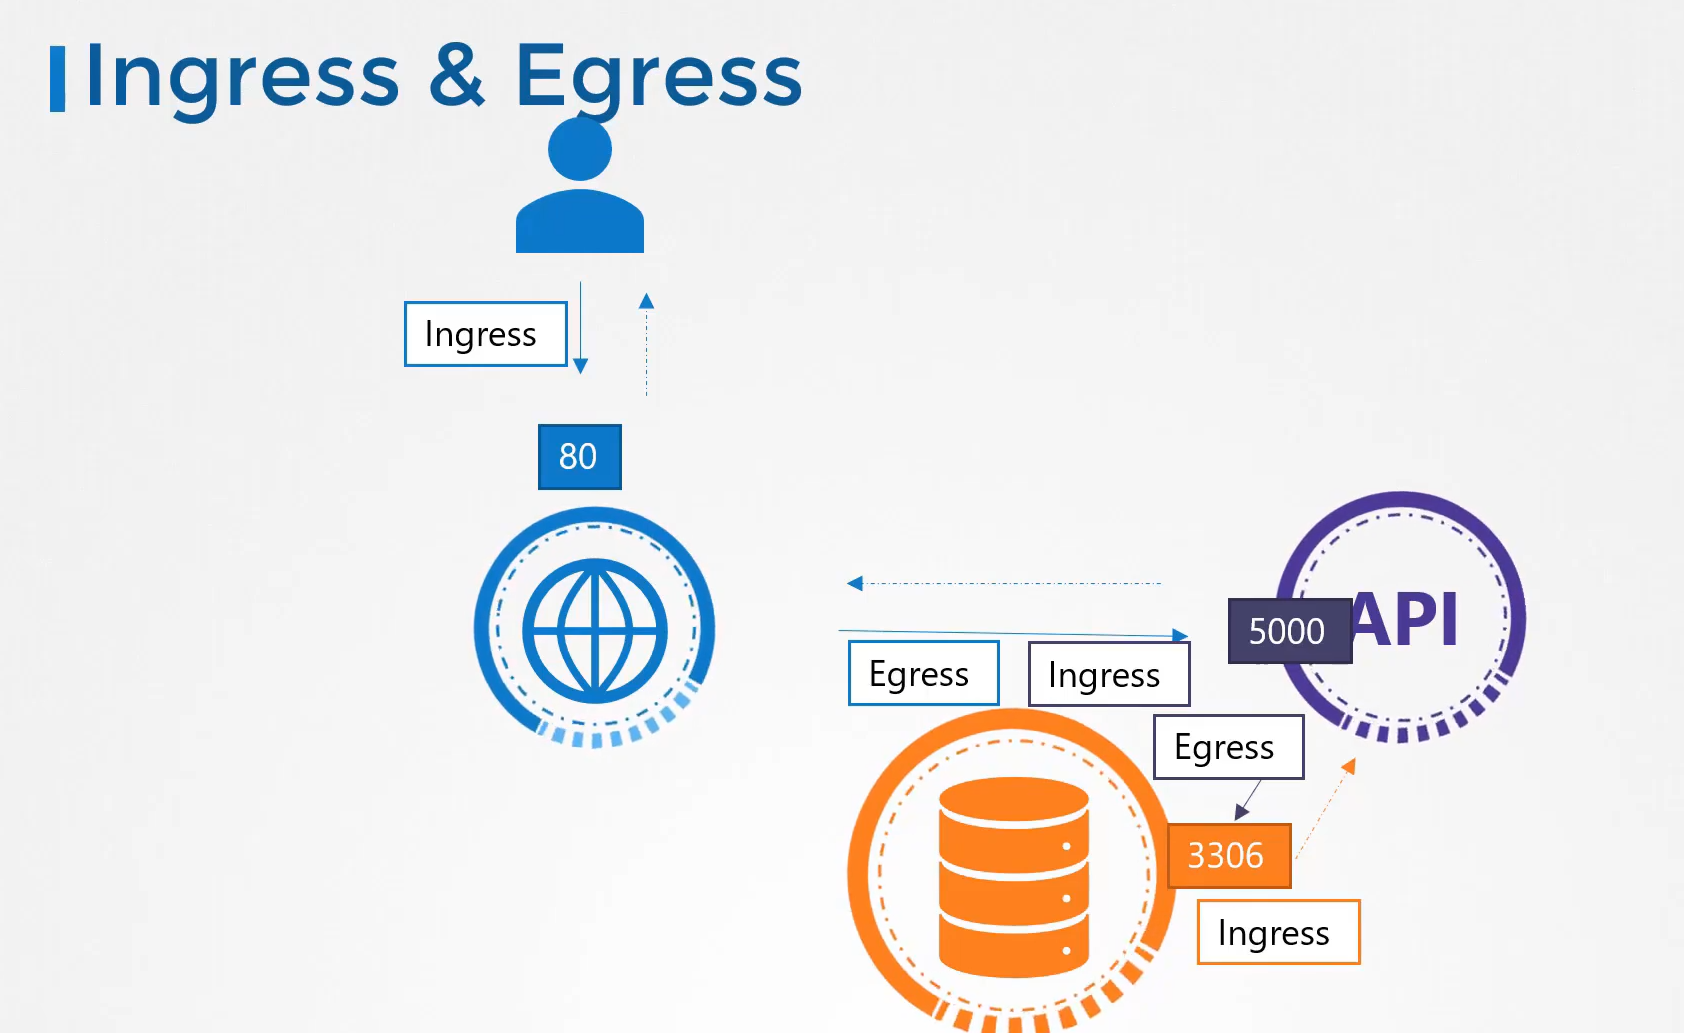
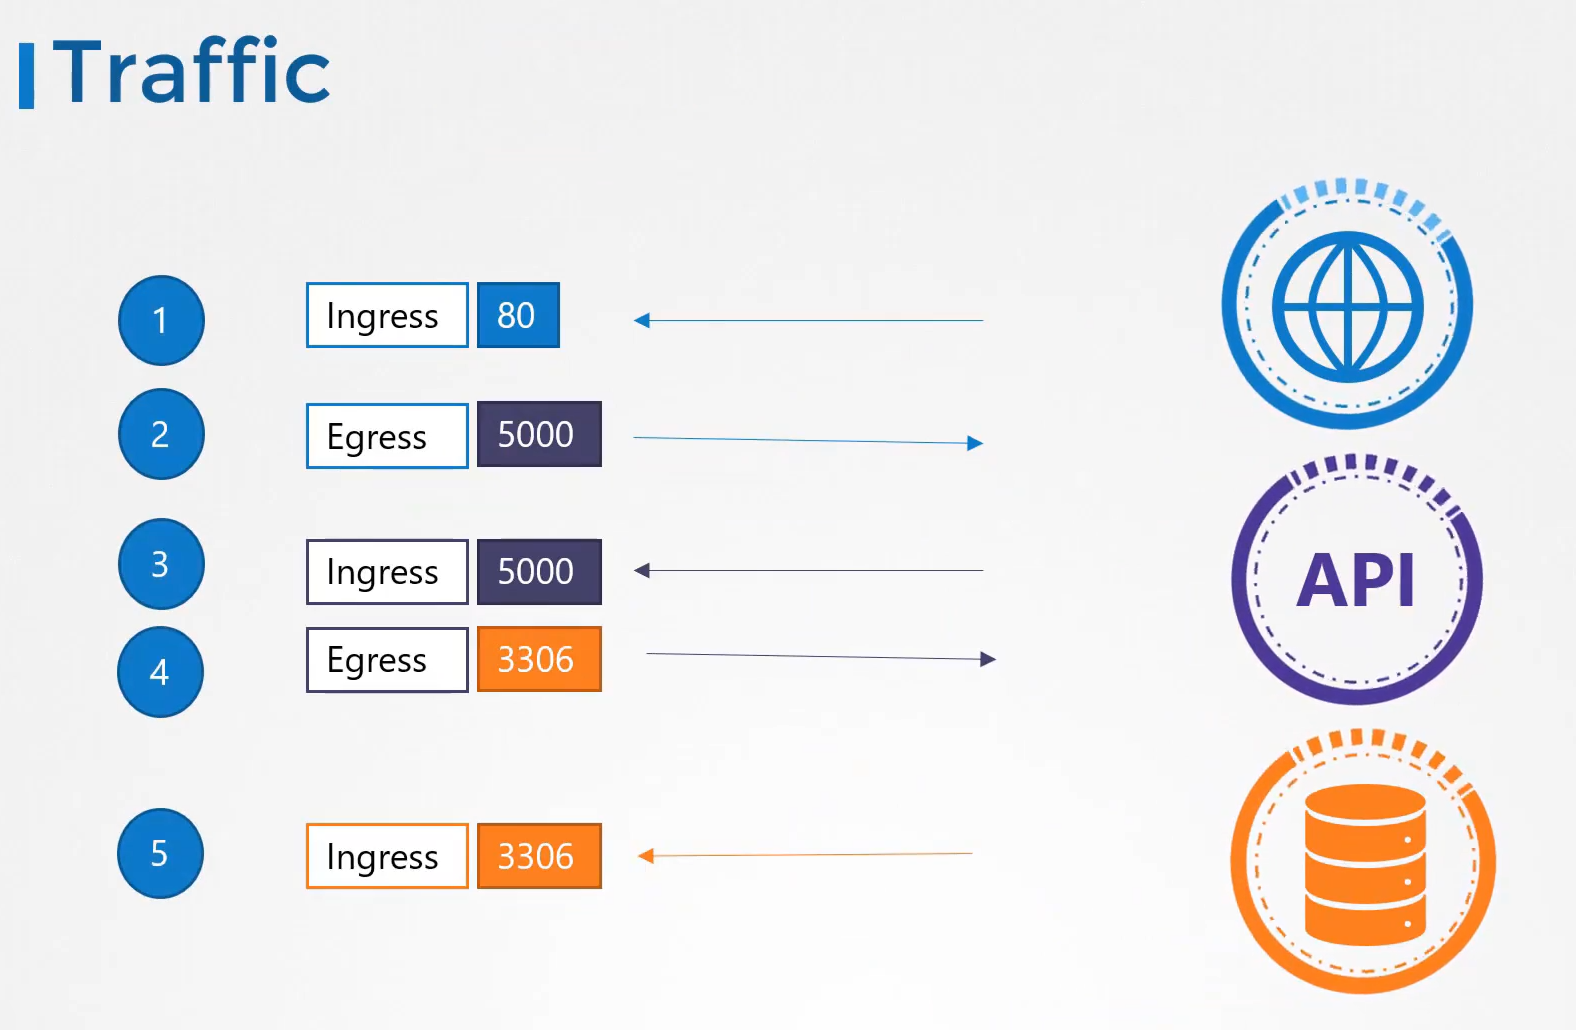
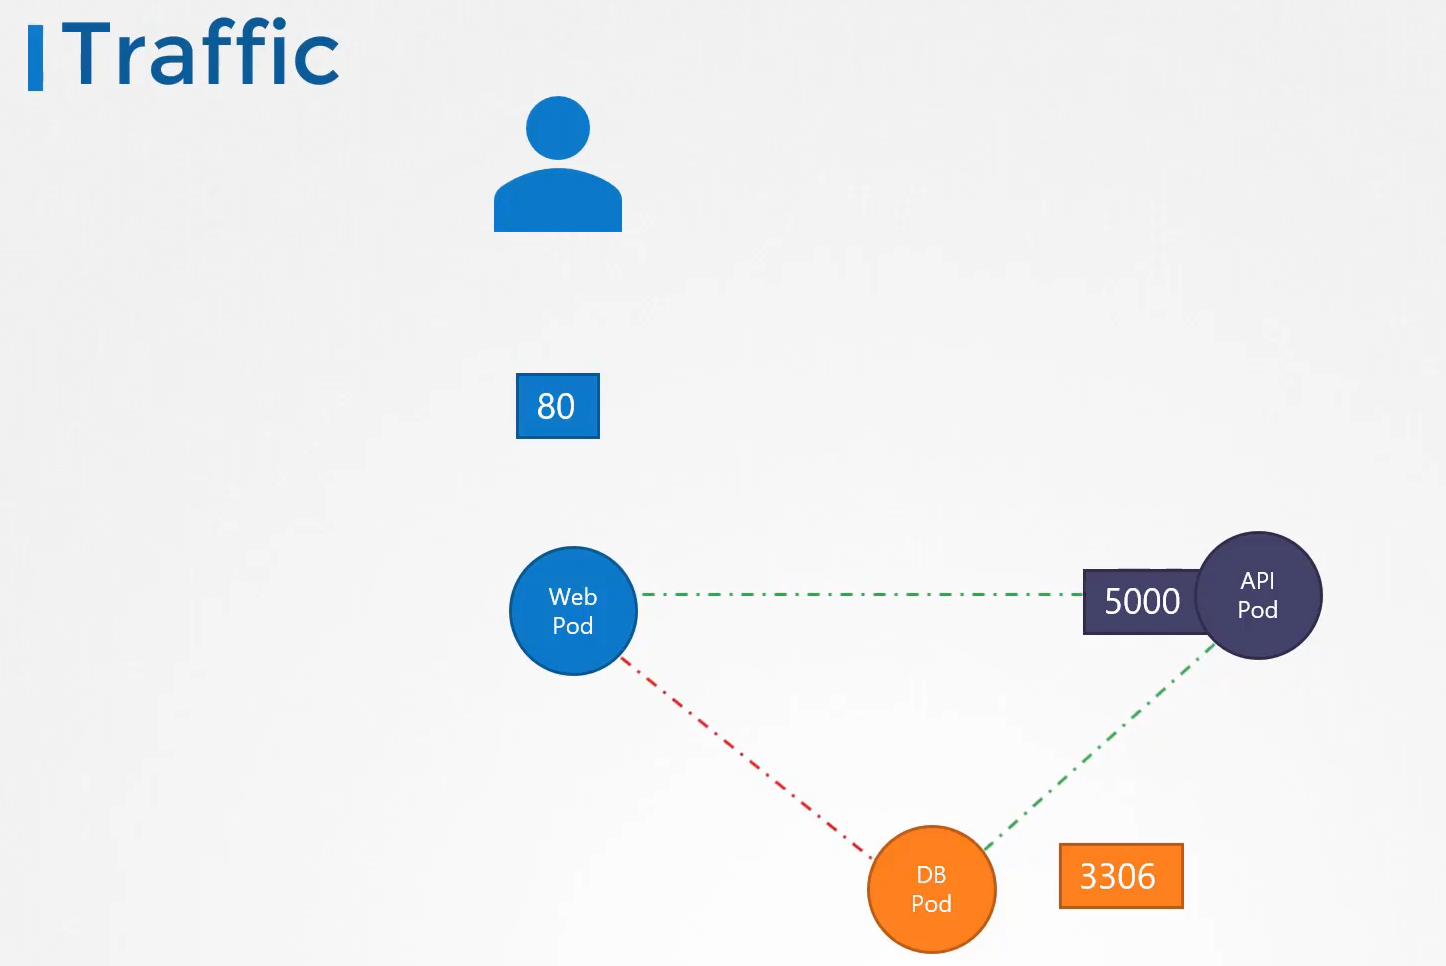
226. Ingress

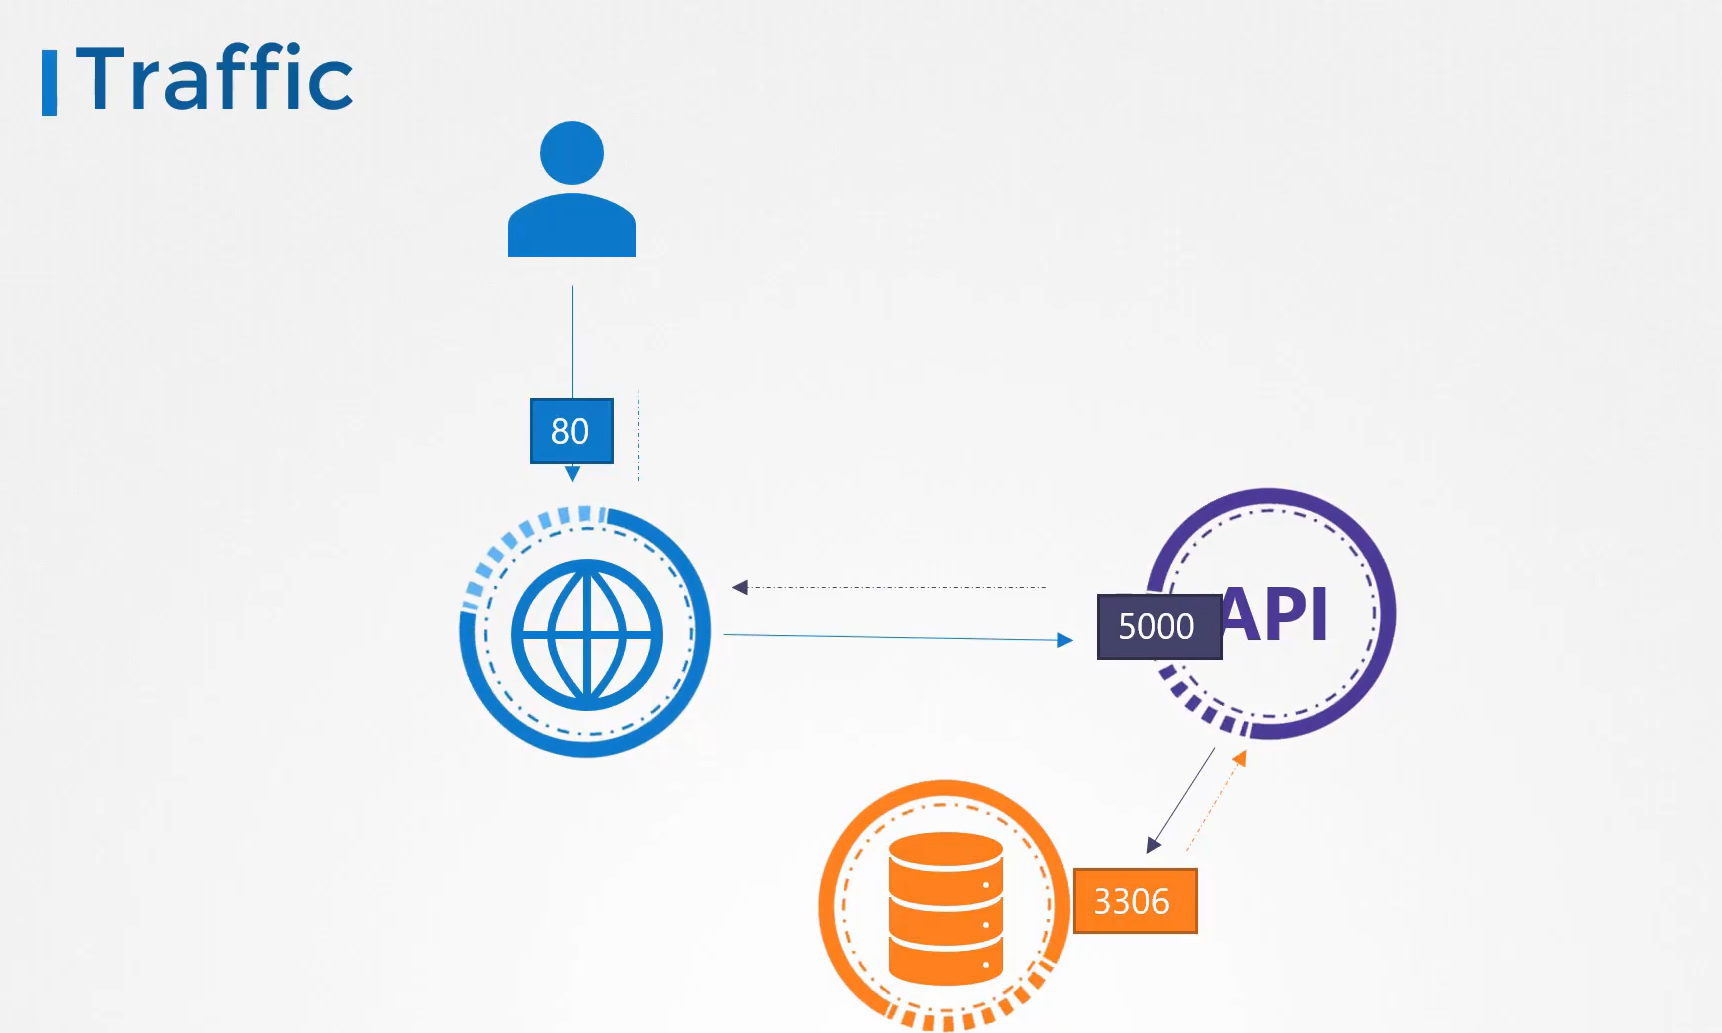
online shop 을 꾸린다고 가정
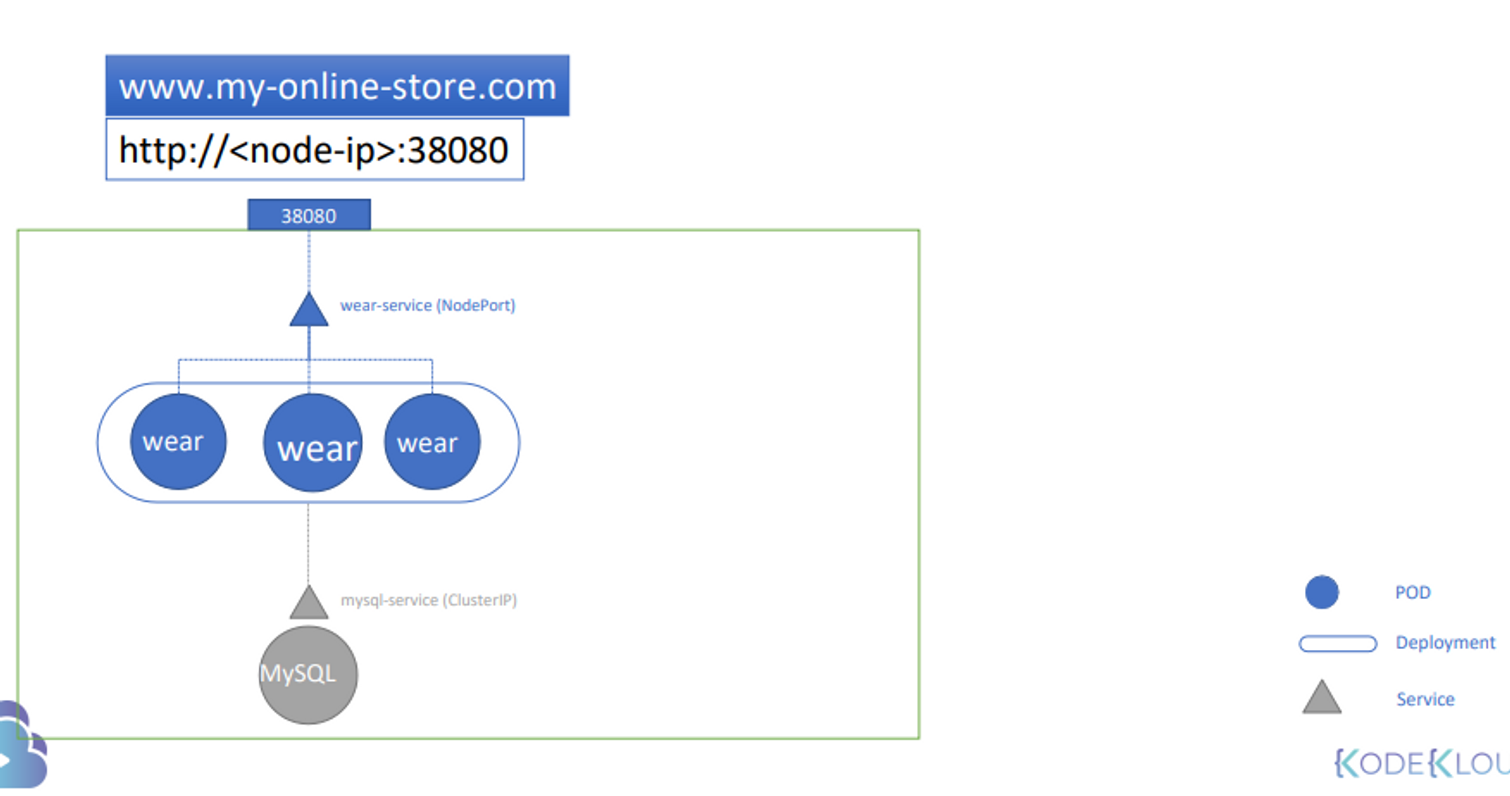
어느 wear 파드에서든 접근 가능하게 하려고 mysql 서비스 생성 cluster ip
외부로 나가는 서비스 wear-service 생성 nodeport
mysql 과 외부에 연결 가능
port 38080
http://node-ip:38080 으로 접속 가능하다.

node ip를 안쓰기 위해 dns 가 필요하고

포트 번호를 안쓰게 하기 위해 proxy 서버가 필요하다. 80 으로 들어오는거 -> 38080 으로

gcp 클라우드 플랫폼을 사용하면 로드 밸런서를 사용할 수 있다.

gcp는 자동으로 로드 밸런서를 설치한다.
gcp load-balancer
gcp는 외부 ip를 갖는다.
my-online-store.com으로 사용 가능하다.


사업이 확장하면서 watch 페이지를 추가하고 싶다면?

이렇게 디플로이먼트, 서비스, 포트를 추가해야겠지?
새로운 로드밸런서는 새로운 ip를 요구한다.
어떻게 url 을 리다이렉트하는가?

/apparel, /video 처럼 로드 밸러서가 필요하다.

보안을 위해 ssl 도 고려해야한다.

쿠버네티스에서 이 모든 걸 한번에 다루면 어떨까?
Ingress

인그레스를 통해 한 url을 이용해 다르게 라우트 할 수 있음.

인그레스도 외부에서 접근 용이하게 하기 위해 서비스가 필요하다.nodeport 38080

한번만 구성하면 된다.

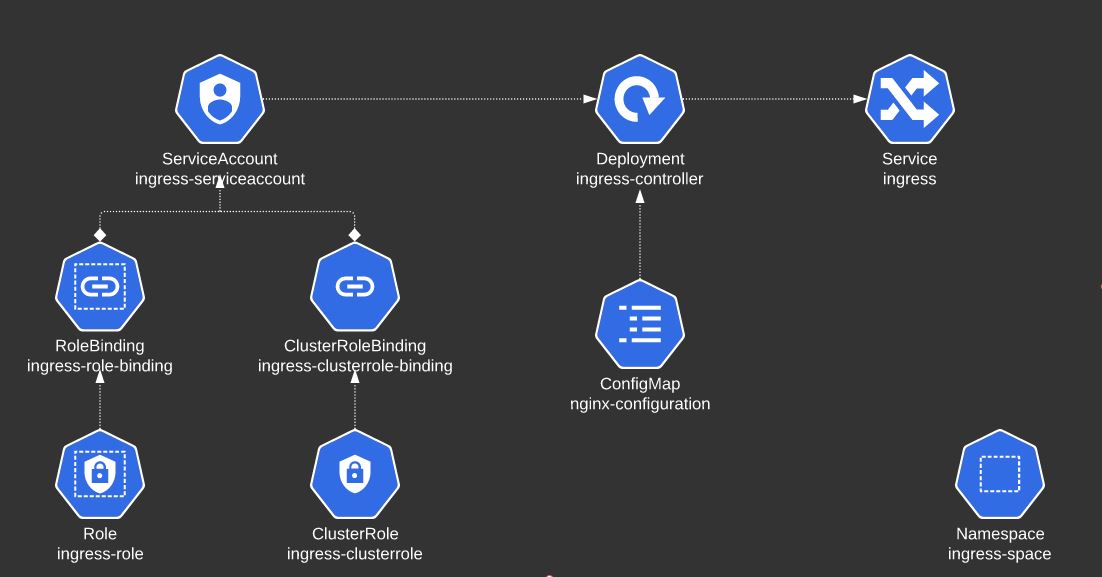
인그레스 컨트롤러와 인그레스 리소스가 필요하다.
인그레스 컨트롤러는 쿠버네티스에 기본 탑재 되어있지 않다. 따로 설치해야한다.

인그레스 컨트롤러 직접 선택해야한다.
nginx 를 사용해보자

nginx 컨트롤러를 디플로이먼트를 통해 배포된다.

configmap 객체를 만들어서 nginx 구성을 넘겨야한다.

파드네임과 네임스페이스도 구성해야한다.

포트 정보

외부로 노출 시키기 위한 서비스도 생성한다.

서비스 어카운트도 필요

인그레스를 사용하기 위해 디플로이먼트, 서비스, 컨피그맵, auth 가 필요하다.

인그레스 리소스
여러가지 규칙들이 저장됨.

인그레스 리소스 예시

backend 도 명시
서비스로 라우팅한다.


여러 케이스에 따라 다르게 라우팅 할 수 있다.

예시들

인그레스 리소스를 구성해보자

싱글 도메인 네임을 추가한다.
www.my-online-store.com 에 진입할 수 있게 한다.

/wear
/watch
서비스로 연결 시킨다.

인그레스를 확인하면 두개의 url 이 있다.
default 백엔드가 존재한다.
default-http-backend 서비스에 연결된다.

228. Practice Test - Ingress -1
1. We have deployed Ingress Controller, resources and applications. Explore the setup.
2. Which namespace is the Ingress Controller deployed in?
ingress-nginx
3. What is the name of the Ingress Controller Deployment?
ingress-nginx-controller
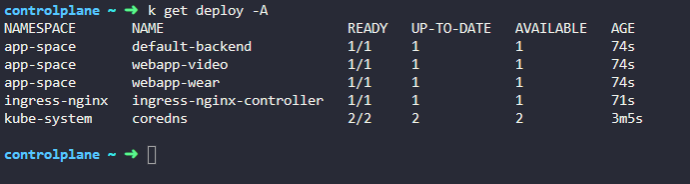
4. Which namespace are the applications deployed in?
app-space
5. How many applications are deployed in the app-space namespace?
Count the number of deployments in this namespace.
3개
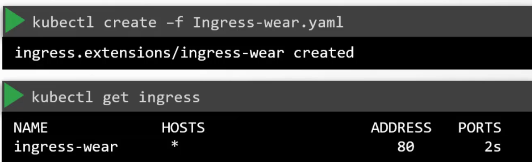
6. Which namespace is the Ingress Resource deployed in?

app space
7. what is the name of the ingress resource?
ingress-wear-watch
8. What is the Host configured on the Ingress Resource?
The host entry defines the domain name that users use to reach the application like www.google.com

all host
9. What backend is the /wear path on the Ingress configured with?
wear-service
10. At what path is the video streaming application made available on the Ingress?
/watch
11. If the requirement does not match any of the configured paths what service are the requests forwarded to?
no service
12. Now view the Ingress Service using the tab at the top of the terminal. Which page do you see?

404 error page
13. View the applications by appending /wear and /watch to the URL you opened in the previous step.


14. You are requested to change the URLs at which the applications are made available.
Make the video application available at /stream.

15. View the Video application using the /stream URL in your browser.

16. A user is trying to view the /eat URL on the Ingress Service. Which page would he see?

17. Due to increased demand, your business decides to take on a new venture. You acquired a food delivery company. Their applications have been migrated over to your cluster.

18. You are requested to add a new path to your ingress to make the food delivery application available to your customers.
Make the new application available at /eat.

19. View the Food delivery application using the /eat URL in your browser.

20. A new payment service has been introduced. Since it is critical, the new application is deployed in its own namespace.

critical space
21. What is the name of the deployment of the new application?
webapp-pay
22. You are requested to make the new application available at /pay.

pay-service 가 있다 포트 8282 확인

ingress 만들기
23. View the Payment application using the /pay URL in your browser.

231. Practice Test - Ingress - 2
1. We have deployed two applications. Explore the setup.

2. Let us now deploy an Ingress Controller. First, create a namespace called ingress-nginx.
We will isolate all ingress related objects into its own namespace.


3. The NGINX Ingress Controller requires a ConfigMap object. Create a ConfigMap object with name ingress-nginx-controller in the ingress-nginx namespace.


4. The NGINX Ingress Controller requires two ServiceAccounts. Create both ServiceAccount with name ingress-nginx and ingress-nginx-admission in the ingress-nginx namespace.


5. We have created the Roles and RoleBindings for the ServiceAccount. Check it out!!

6. Let us now deploy the Ingress Controller. Create the Kubernetes objects using the given file. The Deployment and it's service configuration is given at /root/ingress-controller.yaml. There are several issues with it. Try to fix them.
apiVersion: apps/v1
kind: Deployment
metadata:
  labels:
    app.kubernetes.io/component: controller
    app.kubernetes.io/instance: ingress-nginx
    app.kubernetes.io/managed-by: Helm
    app.kubernetes.io/name: ingress-nginx
    app.kubernetes.io/part-of: ingress-nginx
    app.kubernetes.io/version: 1.1.2
    helm.sh/chart: ingress-nginx-4.0.18
  name: ingress-nginx-controller
  namespace: ingress-nginx
spec:
  minReadySeconds: 0
  revisionHistoryLimit: 10
  selector:
    matchLabels:
      app.kubernetes.io/component: controller
      app.kubernetes.io/instance: ingress-nginx
      app.kubernetes.io/name: ingress-nginx
  template:
    metadata:
      labels:
        app.kubernetes.io/component: controller
        app.kubernetes.io/instance: ingress-nginx
        app.kubernetes.io/name: ingress-nginx
    spec:
      containers:
      - args:
        - /nginx-ingress-controller
        - --publish-service=$(POD_NAMESPACE)/ingress-nginx-controller
        - --election-id=ingress-controller-leader
        - --watch-ingress-without-class=true
        - --default-backend-service=app-space/default-http-backend
        - --controller-class=k8s.io/ingress-nginx
        - --ingress-class=nginx
        - --configmap=$(POD_NAMESPACE)/ingress-nginx-controller
        - --validating-webhook=:8443
        - --validating-webhook-certificate=/usr/local/certificates/cert
        - --validating-webhook-key=/usr/local/certificates/key
        env:
        - name: POD_NAME
          valueFrom:
            fieldRef:
              fieldPath: metadata.name
        - name: POD_NAMESPACE
          valueFrom:
            fieldRef:
              fieldPath: metadata.namespace
        - name: LD_PRELOAD
          value: /usr/local/lib/libmimalloc.so
        image: k8s.gcr.io/ingress-nginx/controller:v1.1.2@sha256:28b11ce69e57843de44e3db6413e98d09de0f6688e33d4bd384002a44f78405c
        imagePullPolicy: IfNotPresent
        lifecycle:
          preStop:
            exec:
              command:
              - /wait-shutdown
        livenessProbe:
          failureThreshold: 5
          httpGet:
            path: /healthz
            port: 10254
            scheme: HTTP
          initialDelaySeconds: 10
          periodSeconds: 10
          successThreshold: 1
          timeoutSeconds: 1
        name: controller
        ports:
        - name: http
          containerPort: 80
          protocol: TCP
        - containerPort: 443
          name: https
          protocol: TCP
        - containerPort: 8443
          name: webhook
          protocol: TCP
        readinessProbe:
          failureThreshold: 3
          httpGet:
            path: /healthz
            port: 10254
            scheme: HTTP
          initialDelaySeconds: 10
          periodSeconds: 10
          successThreshold: 1
          timeoutSeconds: 1
        resources:
          requests:
            cpu: 100m
            memory: 90Mi
        securityContext:
          allowPrivilegeEscalation: true
          capabilities:
            add:
            - NET_BIND_SERVICE
            drop:
            - ALL
          runAsUser: 101
        volumeMounts:
        - mountPath: /usr/local/certificates/
          name: webhook-cert
          readOnly: true
      dnsPolicy: ClusterFirst
      nodeSelector:
        kubernetes.io/os: linux
      serviceAccountName: ingress-nginx
      terminationGracePeriodSeconds: 300
      volumes:
      - name: webhook-cert
        secret:
          secretName: ingress-nginx-admission

---

apiVersion: v1
kind: Service
metadata:
  creationTimestamp: null
  labels:
    app.kubernetes.io/component: controller
    app.kubernetes.io/instance: ingress-nginx
    app.kubernetes.io/managed-by: Helm
    app.kubernetes.io/name: ingress-nginx
    app.kubernetes.io/part-of: ingress-nginx
    app.kubernetes.io/version: 1.1.2
    helm.sh/chart: ingress-nginx-4.0.18
  name: ingress-nginx-controller
  namespace: ingress-nginx
spec:
  ports:
  - port: 80
    protocol: TCP
    targetPort: 80
    nodePort: 30080
  selector:
    app.kubernetes.io/component: controller
    app.kubernetes.io/instance: ingress-nginx
    app.kubernetes.io/name: ingress-nginx
  type: NodePort
뭐가 문제인지 모르겠다. 그냥 복붙했다.
7. Create the ingress resource to make the applications available at /wear and /watch on the Ingress service.
Also, make use of rewrite-target annotation field: -
nginx.ingress.kubernetes.io/rewrite-target: /
Ingress resource comes under the namespace scoped, so don't forget to create the ingress in the app-space namespace.
.

8. Access the application using the Ingress tab on top of your terminal.
확인