
239. Introduction to Deployment with Kubeadm
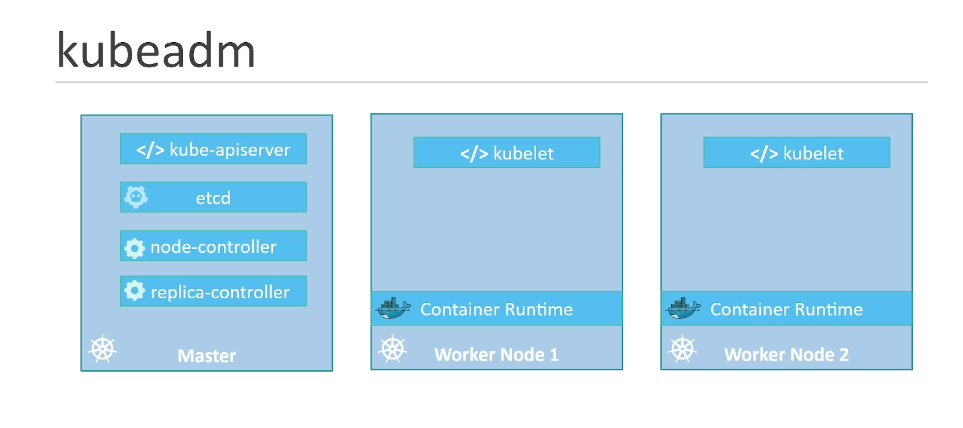
kubeadm 설치하기

마스터 워커노드 정하기
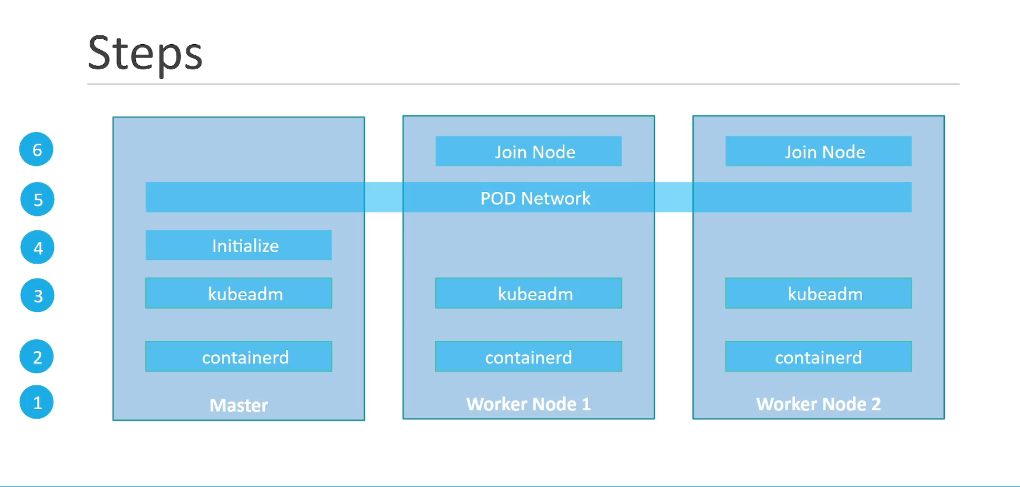
2. 컨테이너 설치
3. kubeadm 설치
4. 마스터노드 초기화
5. 파드네트워크 구성
6. 노드 합치기
241. Deploy with kubeadm - Provision VMs with Vagrant
잠시 보류 하겠다. 연습문제나 풀자.
243. Practice Test - Deploy a Kubernetes Cluster using Kubeadm
1. Install the kubeadm and kubelet packages on the controlplane and node01.
Use the exact version of 1.26.0-00 for both.
Container Runtimes | Kubernetes
Container Runtimes
Note: Dockershim has been removed from the Kubernetes project as of release 1.24. Read the Dockershim Removal FAQ for further details. You need to install a container runtime into each node in the cluster so that Pods can run there. This page outlines what
kubernetes.io
컨테이너 런타임 설치
cat <<EOF | sudo tee /etc/modules-load.d/k8s.conf
overlay
br_netfilter
EOF

sudo modprobe overlay
sudo modprobe br_netfilter

# sysctl params required by setup, params persist across reboots
cat <<EOF | sudo tee /etc/sysctl.d/k8s.conf
net.bridge.bridge-nf-call-iptables  = 1
net.bridge.bridge-nf-call-ip6tables = 1
net.ipv4.ip_forward                 = 1
EOF

# Apply sysctl params without reboot
sudo sysctl --system
control plane, node01 동일하게 설치한다.

리눅스 계열을 먼저 확인하자

cat /etc/*-release
debian 계열이다.
Installing kubeadm | Kubernetes
Installing kubeadm
This page shows how to install the kubeadm toolbox. For information on how to create a cluster with kubeadm once you have performed this installation process, see the Creating a cluster with kubeadm page. Before you begin A compatible Linux host. The Kuber
kubernetes.io


2번째 단계에서 오류가 뜬다.
Note: In releases older than Debian 12 and Ubuntu 22.04, /etc/apt/keyrings does not exist by default. You can create this directory if you need to, making it world-readable but writeable only by admins.
/etc/apt/keyring 경로를 만들어야한다.


2. What is the version of kubelet installed?

3. How many nodes are part of kubernetes cluster currently? Are you able to run kubectl get nodes?

4. Lets now bootstrap a kubernetes cluster using kubeadm.
The latest version of Kubernetes will be installed.
kubeadm 으로 부트 스트랩 해보자
5. Initialize Control Plane Node (Master Node). Use the following options:
- apiserver-advertise-address - Use the IP address allocated to eth0 on the controlplane node
- apiserver-cert-extra-sans - Set it to controlplane
- pod-network-cidr - Set to 10.244.0.0/16
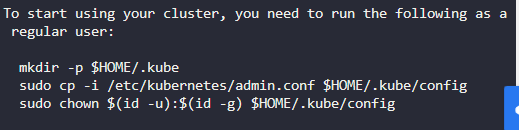
Once done, set up the default kubeconfig file and wait for node to be part of the cluster.

eth0를 보면 192.12.244.12/24
cidr 는 10.244.0.1/24


이제 노드를 가져올 수 있다 .
6. Generate a kubeadm join token
Or copy the one that was generated by kubeadm init command

kubeadm join 192.12.244.12:6443 --token mqq4i8.usxdgtriyn085v78 \
--discovery-token-ca-cert-hash sha256:00bdc46e9d70d4ea1d900713b05c91bf95d99a48451b8de5faae3faa1c1667f4
7. Join node01 to the cluster using the join token

8. Install a Network Plugin. As a default, we will go with flannel
Refer to the official documentation for the procedure.
Installing Addons | Kubernetes
GitHub - flannel-io/flannel: flannel is a network fabric for containers, designed for Kubernetes

'쿠버네티스' 카테고리의 다른 글
| [K8s 보안 입문] Security Context 한 번에 정리하기 (0) | 2025.06.17 |
|---|---|
| 쿠버네티스 컴포넌트 정리 kubernetes component (0) | 2024.09.03 |
| 쿠버네티스 10: Design and Install a Kubernetes Cluster (0) | 2023.03.02 |
| 쿠버네티스 9-(4): Networking Certified Kubernetes Administrator (CKA) with Practice Tests (0) | 2023.02.27 |
| 쿠버네티스 9-(3): Networking Certified Kubernetes Administrator (CKA) with Practice Tests (0) | 2023.02.26 |


