we can set a limitation on the pods so that they only run on particular nodes.
pod에 제약 조건을 추가함으로써 특정 node 에 분배되게 할 수 있다.
nodeSelector
nodeSelector 옵션을 추가함으로써 node 의 크기 제약조건을 추가할 수 있다.
그런데 nodesize 가 large 는 진짜 large 인가? 기준은 뭔가?
Where did the size large come from and how does Kubernetes know which is the large node. The key value
pair of size and large are in fact labels assigned to the nodes the scheduler uses these labels to match
and identify the right note to place the pods on labels and selectors are a topic we have seen many
times throughout this Kubernetes course
nodeSelector 도 label을 사용하는 것이다.
따라서 먼저 node에 label을 달아야한다.
Label Nodes
taint랑 비슷하다.
node label 을 정한 후 nodeSelector 를 설정하면 pod는 해당 node 에게만 분배된다.
만약 node 의 제약 조건이 복잡해진다면?
nod Affinity 로 처리한다.
61. Node Affinity
Node 의 복잡한 제약 조건을 위해 Node Affinity 개념이 필요하다 .
단순 nodeSelector를 label로만 사용하면 복잡한 조건을 사용할 수 없다.
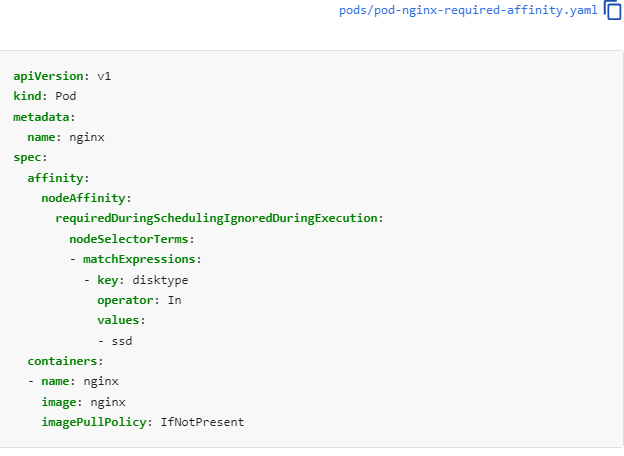
nodeSelector 대신에 affinity 속성이 하나 생긴다.
requiredDuringSchedulingIgnoredDuringExecution
nodeSelectorTerms
마지막에 key, operator , value
operator in 의 의미는 values에 정의된 리스트에 포함되면 배치가능하다는 것을 의미
여기엔 Large 밖에 없으니 Large만 됨
필요하다면 large 밑에 -medium 추가 이런식
또는 NotIn operator 를 지정해 포함안되는 것만 정의할 수 있음.
Exists operator를 사용하면 label 여부만으로 배정 가능하게 한다.
만약 누가 node의 label을 변경한다면? 어떻게 될까?
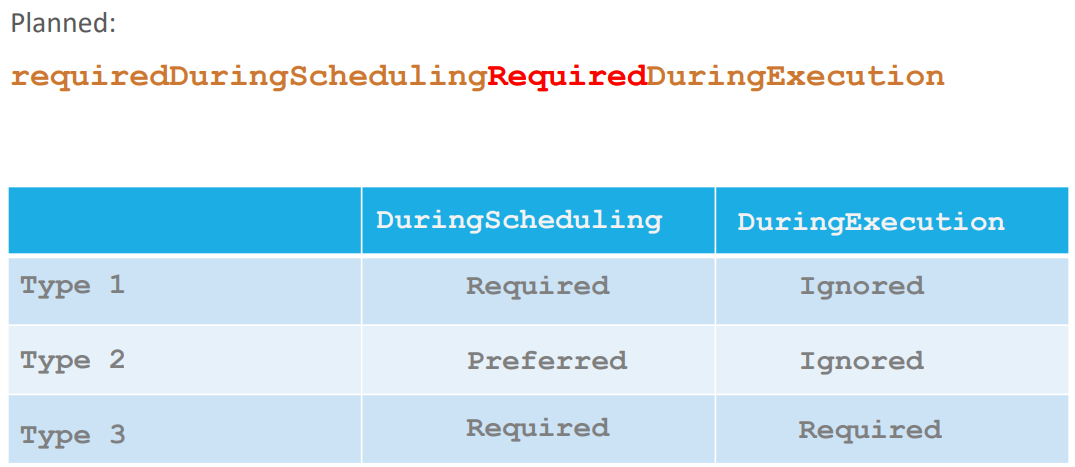
Node Affinity Types
위에 세가지 경우가 있다.
Available
기본적으로 pod는 두가지 life cycle 이 있다.
1. DuringScheduling
Is the state where a pod does not exist and is created for the first time.
pod가 생성될때
when a pod is first created the affinity rules specified are considered to place
the pods on the right note.
affinitiy rule는 pod를 적당한 node 에 배정할려고 할 것이다.
하지만 node label이 안되어있다면?
Required
the scheduler will mandate that the pod be placed
on a node with a given affinity.
scheduler는 pod를 affinity 에 따라 배정할려고 함.
만약 없다면 배정되지 않는다.
This type will be used in cases where the placement of the pod is crucial.
If a matching node does not exist the pod will not be scheduled.
따라서 requiredDuringScheduling에서 affinity에 정의된 label이 있으면 배정하고 없으면 배정 안한다.
Preferred
pod의 배정위치가 중요한게 아닌 pod 실행 자체가 중요한 경우
affinity에 정의된 node 가 없어도 그냥 아무 node 에 pod를 배정한다.
2. DuringExecution
during execution is the state
where a pods has been running and a change is made in the environment that affects node affinity such
as a change in the label of a node.
DuringExecution 은 pod이 실행되고 node affinity 가 변하는 등 변화가 있는 상태
만약 실행 중인 node의 label을 삭제한다면? label=large 를 삭제 하는 경우
Igonred
As you can see the two types of node affinity available today has this value set too ignored which means
pods will continue to run and any changes in node affinity will not impact them once they are scheduled.
pods는 계속 실행된다.
Planned
위의 케이스는 node label 이 변경되면 pod를 방출한다.
62. Practice Test- Node Affinity
1.
How many Labels exist on node node01?
2.
What is the value set to the label keybeta.kubernetes.io/archonnode01?
3.
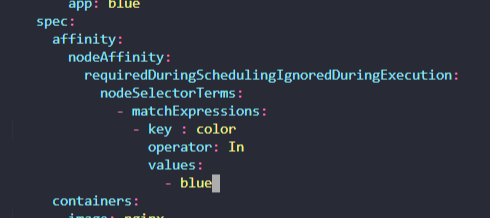
Apply a labelcolor=blueto nodenode01
노드에 레이블 추가하는 법
4.
Create a new deployment namedbluewith thenginximage and 3 replicas.
5.
Which nodescanthe pods for thebluedeployment be placed on?
Make sure to check taints on both nodes!
taints 가 설정된게 없기 때문에 두 Node 모두 pods을 배정 받는다.
6.
Set Node Affinity to the deployment to place the pods onnode01only.
문서 활용
7.
Which nodes are the pods placed on now?
8.
Create a new deployment namedredwith thenginximage and2replicas, and ensure it gets placed on thecontrolplanenode only.
Use the label key -node-role.kubernetes.io/control-plane- which is already set on thecontrolplanenode.
taints는 none
해당 key 만 존재하는 걸로 한다.
64. Taints and Tolerations vs Node Affinity
taints 는 node 에 접근 제한
tolerations는 pod가 taints를 뚫고 node 에 배치
node Affinity 는 pod 가 특정 node 에 배치 시키는 것
Taints & Tolerations
pod를 각각 알맞은 node 에 배정되게 하는 것을 가정하자
blue, red,green 에 taints를 뿌리고 pod 에는 tolerations을 한다.
하지만 red pod에 tolerations 가 있음에도 불구하고 other node 에 배치 될 수 있다.
node affinity
node affinity 는 node 에 label 을 매긴다.
pods 에선 node selector 를 기입한다.
문제는 아무것도 정하지 않은 pod가 blue, red, green node에 배정 될 수도 있다는 점이다.
막을 방법이 없다.
그러면 하이브리드로 다른 pod의 배정을 막기위해 blue, red, green 에는 taint를 바른다.
그리고 pods 엔 node affinity로 지정한 node로만 배정 받게 한다.
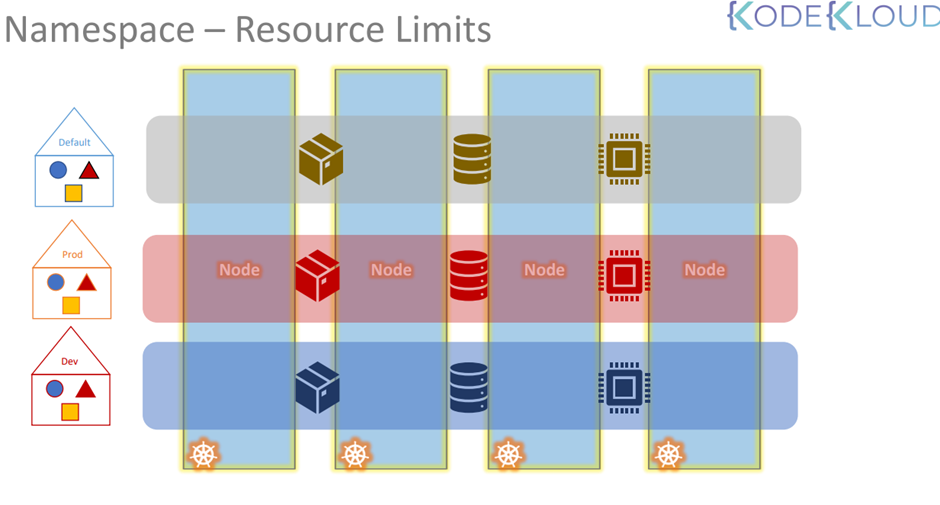
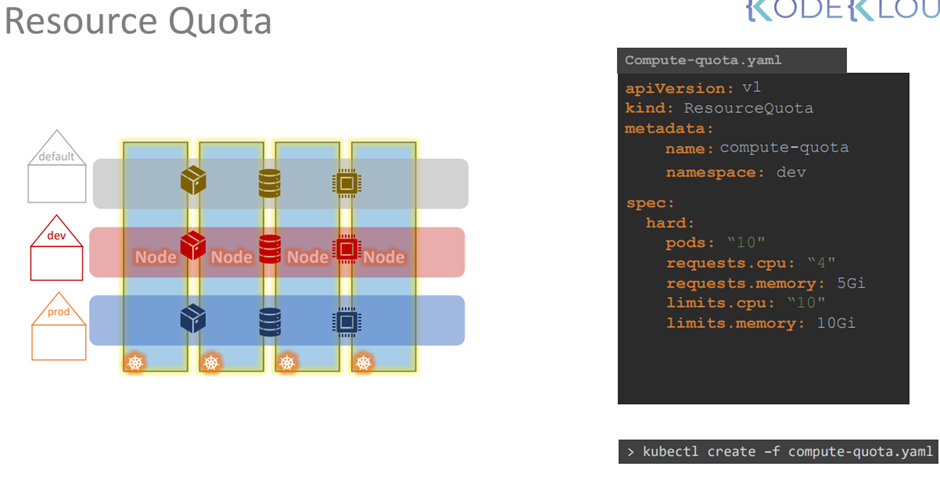
65. Resource Requirements and Limits
node cluster 가 있다고 치자
각 node cluster는 cpu, memory, disk 로 구성
테트리스랑 비슷함.
pod 가 node 에 맞게 배치되어야함.
pod이 배정되었는데 node의 자원이 부족하다? -> pending state가 된다.
Resource Requests
By default, Kubernetes assumes that a pod or a container within a port requires 0.5 CPU and 256,
maybe byte of memory.
This is known as the resource request for a container.
만약 pod 가 더 많은 자원을 요구한다면?
yaml 파일 spec -> containers 하단에 resources 를 추가한다.
One count of CPU is equal to one VC CPU.
1m 는 백만을 의미
쿠버네티스는 기본적으로 컨테이너 하나에 1 cpu 까지 할당 메모리는 512 바이트까지 할당
limits 를 추가해서 memory, cpu 한계를 정할 수 있다.
만약 메모리가 자원이 부족할 정도로 사용되면
pod는 자동적으로 삭제된다.
66. Note on default resource requirements and limits
In the previous lecture, I said - "When a pod is created the containers are assigned a default CPU request of 0.5 and memory of 256Mi". For the POD to pick up those defaults you must have first set those as default values for request and limit by creating a LimitRange in that namespace.
pod이 생성될때 cpu 기본요구 사항을 0.5 , 메모리 256 mb 라고 했는데 이것도 사실 미리 정의해야함.
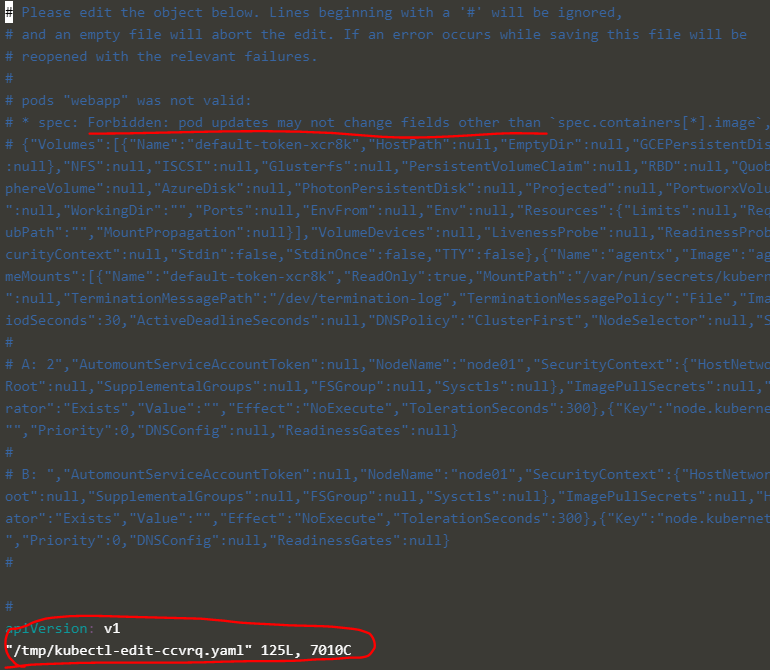
Remember, you CANNOT edit specifications of an existing POD other than the below.
아래의 pods spec은 수정 불가능하다.
spec.containers[*].image
spec.initContainers[*].image
spec.activeDeadlineSeconds
spec.tolerations
For example you cannot edit the environment variables, service accounts, resource limits (all of which we will discuss later) of a running pod. But if you really want to, you have 2 options:
실행중인 pod는 함부로 수정 못하지만 2가지 방법이 있다.
1.
Run thekubectl edit pod <pod name> command. This will open the pod specification in an editor (vi editor). Then edit the required properties. When you try to save it, you will be denied. This is because you are attempting to edit a field on the pod that is not editable.
A copy of the file with your changes is saved in a temporary location as shown above.
수정이 거부된다.
대신 수정 사항은 위의 장소에 임시 보관된다.
You can then delete the existing pod by running the command:
kubectl delete pod webapp
기존 pod 을 삭제하고
kubectl create -f /tmp/kubectl-edit-ccvrq.yaml
위의 경로에서 create를 한다.
2.
The second option is to extract the pod definition in YAML format to a file using the command
kubectl get pod webapp -o yaml > my-new-pod.yaml
기존 pod으로부터 yaml 파일을 얻어낸다. get
vi my-new-pod.yaml
수정
kubectl delete pod webapp
기존 pod 삭제
kubectl create -f my-new-pod.yaml
생성
Edit Deployments
kubectl edit deployment my-deployment
Deployments는 pods 들을 관리한다.
따라서 deployments 에서 수정하면 pod 들을 삭제하고 새로운 pod가 생성된다.
68. Practice Test - Resource Requirements and Limits
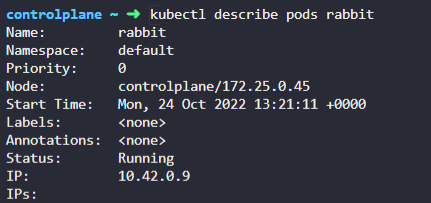
1.
A pod called rabbitis deployed. Identify the CPU requirements set on the Pod in the current(default) namespace
2.
Delete therabbitPod. Once deleted, wait for the pod to fully terminate.
3.
Another pod calledelephanthas been deployed in the default namespace. It fails to get to a running state. Inspect this pod and identify theReasonwhy it is not running.
oomkilled?
4.
The statusOOMKilledindicates that it is failing because the pod ran out of memory. Identify the memory limit set on the POD.
memory 부족을 의미한다.
5.
Theelephantpod runs a process that consume 15Mi of memory. Increase the limit of theelephantpod to 20Mi.
Delete and recreate the pod if required. Do not modify anything other than the required fields.
Pod Name: elephant
Image Name: polinux/stress
Memory Limit: 20Mi
실행 중인 pods를 수정하는 것!
pod 삭제하고 다시 실행
6.
Inspect the status of POD. Make sure it's running
7.
Delete theelephantPod. Once deleted, wait for the pod to fully terminate.
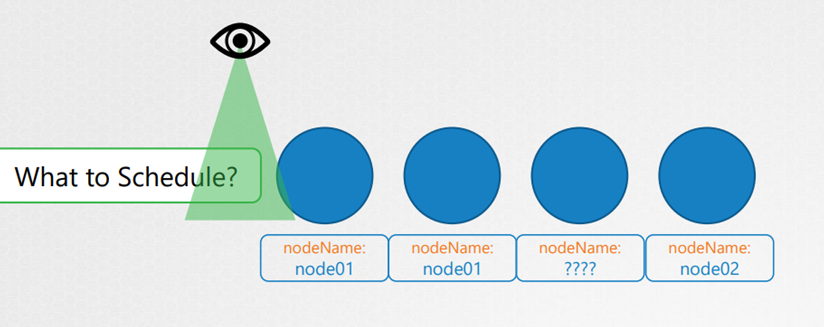
Once identified it schedules the POD on the Node by setting the node Name property to the name of the node by creating a binding object.
scheduler가 nodeName 이 설정 안된 pod를 보면 nodeName을 지어주고 객체를 생성하고 바인딩한다.
만약 scheduler가 없다면 무슨 일이 벌어질까?
pod는 pending status 에 머무르게 된다.
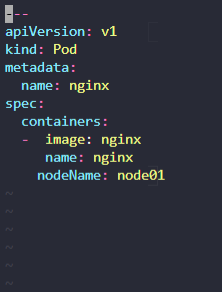
You can manually assign pods to node yourself. Well without a scheduler, the easiest way to schedule a pod is to simply set the node name field to the name of the node in your pod specification while creating the POD.
수동으로 pod를 할당하는 가장 쉬운 방법은 nodeName을 직접 기입하는 것이다.
pod가 running status 가 되었다.
pod를 생성할때 nodeName을 지정할 수 있다.
만약 pod가 미리 생성되어있고 pod를 node에 할당할려고 한다면?
Kubernetes won’t allow you to modify the node Name property of a pod.
쿠버네티스에서는 pod 의 nodeName을 수정하게 두지 않는다.
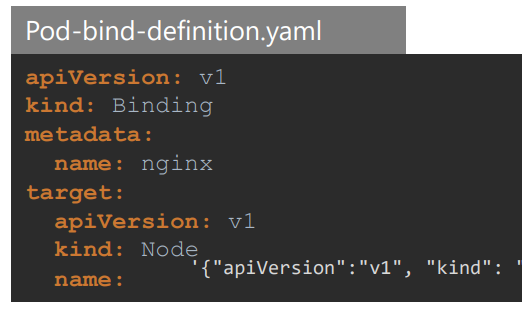
So another way to assign a note to an existing pod is to create a binding object and send a post request to the pod binding API thus mimicking what the actual scheduler does.
pod 와 node를 연결해주는 객체인 binding을 하나 생성하고 연결을 요청한다.
scheduler 가 하는 일을 모방한 것.
바인딩에는 nodeName이 들어간다.
. Then send a post request to the pods binding API with the data set to the binding object in a JSON format.
위와 같이 요청을 보내면 pod가 바인딩 된다. 이때 json 포맷
So you must convert the YAML file into its equivalent JSON format.
JSON 포멧으로 변경된다는 점을 유의하자!
52. Practice Test - Manual Scheduling
1.
A pod definition filenginx.yamlis given. Create a pod using the file.
Only create the POD for now. We will inspect its status next.
apply 로 pod 생성
2.
What is the status of the created POD?
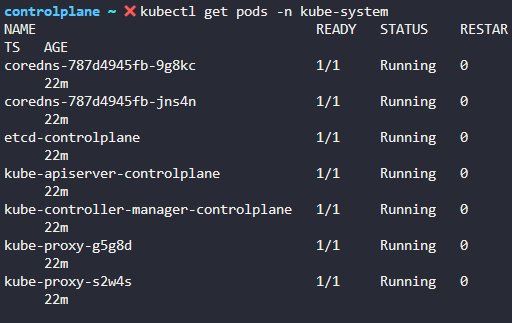
3.
Why is the POD in a pending state?
Inspect the environment for various kubernetes control plane components.
kubectl get pods -n kube-system 에서 scheduler가 없는 것을 확인
4.
Manually schedule the pod onnode01.
Delete and recreate the POD if necessary.
yaml 파일 변경하고 pod 삭제하고 apply 하기
아니면 replace --force 로 변경 가능하다.
5.
Now schedule the same pod on thecontrolplanenode.
Delete and recreate the POD if necessary.
nodeaName은 바로 spec 밑으로 간다.
53. Solution - Manual Scheduling
54. Labels and Selectors
분류할때 labels 을 사용하는 것이 좋다.
selectors 는 필터 역할
We have created a lot of different types of Objects in Kuberentes. Pods, Services, ReplicaSets and Deployments.
etc. For Kubernetes, all of these are different objects.
metadata 의 label 에서 여러 가지 label을 지정할 수 있다. (yaml 파일에서 )
이 label은 나중에 분류할때 요긴하게 쓰인다.
selector 옵션 사용하기
kubectl get pods --selector app=App1
annotation 가능
55. Practice Test - Labels and Selectors
1.
We have deployed a number of PODs. They are labelled withtier,envandbu. How many PODs exist in thedevenvironment (env)?
Use selectors to filter the output
7개
2.
How many PODs are in thefinancebusiness unit (bu)?
3.
How many objects are in theprodenvironment including PODs, ReplicaSets and any other objects?
kubectl get all --selector 조건 이렇게 할 수 있음
4.
Identify the POD which is part of theprodenvironment, thefinanceBU and offrontendtier?
쉼표를 붙여써야한다.
5.
A ReplicaSet definition file is givenreplicaset-definition-1.yaml. Try to create the replicaset. There is an issue with the file. Try to fix it.
tier 를 맞춰준다.
57. Taints and Tolerations
pod와 node 의 관계를 생각하자
벌레가 사람 몸에 착지한다고 가정하자
사람한테는 모기 방지 스프레이를 뿌렸다.
스프레이에 민감한 벌레는 사람에게서 벗어나겠지만 면역인 벌레는 사람 몸에 착지할 거다.
So there are two things that decide if a bug can land on a person.
First the taint on the person.
And second the bugs toleration level to that particular taint
모기를 막는 요소는 두가지
첫째 사람의 모기 스프레이 강도
둘째 모기의 면역 정도
노드가 사람이고 컨테이너가 벌레
taints 와 toleration은 어떤 pod가 스케쥴 될수 있는지 정한다.
pod 가 생성되면 scheduler는 pod를 worker node 에 배정하려고 한다.
만약 node1을 특별한 이유에서 pod를 안올리고 싶다면 ?
node 에 taint 작업을 하면 pod가 올려지는 것을 막는다.
만약 D pod를 올리고 싶게 한다면 toleration 을 설정한다.
그러면 node1 은 d pod 만 쓸 수 있다.
It goes through so remember trains are set on nodes and toleration are set on pods.
Taints 사용법
node 이름을 명시한다.
key value 가 뒤에 따라온다.
taint-effect는 세개가 있다.
NoSchedule : toleration 가 없으면 pod 스케쥴 x , 기존 실행되던 pod에는 적용 안됨
PreferNoSchedule: toleration이 없으면 pod을 스케줄링안하려고 하지만 확실하지 않음 클러스터내에 자원이 부족하거나 하면 taint가 걸려있는 노드에서도 pod이 스케줄링될 수 있음
NoExecute : toleration 이 없으면 pod 스케쥴 x, 기존에 실행되는 pod도 toleration 없으면 종료
tolerations 은 pod 에서 정의 가능함. 쌍따옴표로 해야함.
NoExecute
잘돌아가던 node1 에 갑자기 taints 를 걸고 pod d 에 tolerations을 건다면?
NoExecute taints는 현재 진행중인 pod를 대상으로 하기 때문에 tolerations이 없는 c pod를 방출시키고 d pod는 유지 시킨다.
하지만 명심해야할 것이 pod d 에 toleration이 있다고해서 무조건 node 1 에만 배정되는 것이 아니다!
taints, toleration은 경계 조건처럼 사용해야한다!
master node 도 사실 똑같은 node 이다. 하지만 여러 막강한 기능을 더 첨가한...
최초 master node 는 그 어떤 pod도 배정되지 않게 taints 가 되어있다.
master node는 쓰지 않는 것이 좋다.
master node 를 보면 위와 같이 taints 가 되어있다.
58. Practice Test - Taints and Tolerations
1.
How manynodesexist on the system?
Including thecontrolplanenode.
2.
Do any taints exist onnode01node?
3.
Create a taint onnode01with key ofspray, value ofmorteinand effect ofNoSchedule
4.
Create a new pod with thenginximage and pod name asmosquito.
5.
What is the state of the POD?
6.
Why do you think the pod is in a pending state?
node가 taint 를 가지고 있음.
7.
Create another pod namedbeewith thenginximage, which has a toleration set to the taintmortein.
사이트 검색해서 사용하자
8.
Notice thebeepod was scheduled on nodenode01despite the taint.
bee pod는 tolerations 이 있기 때문에 node01 taints 에도 불구하고 배치 받은 것
9.
Do you see any taints oncontrolplanenode?
10.
Remove the taint oncontrolplane, which currently has the taint effect ofNoSchedule.
remember the scheduler is only responsible for deciding which pod goes on which node. It doesn’t actually
place the pod on the nodes.
Scheduler은 어떤 pod를 어떤 nodes에 적재할지를 정한다. ( 결정만 하고 직접 포드를 노드에 옮기지 않는다. )
Pod를 만들고 어느 노드로 보낼지만 정한다 .
Scheduler는 적당한 컨테이너에 적재하도록 해야한다.
Pod를 최적의 노드에 분배할떄 원칙이 있다.
10 코어 pod를 노드에 실어야한다고 생각해보자
Filter 노드가 조건에 맞는 컨테이너만 남긴다. (3,4 번 남음)
Rank node는 적재를 했을 경우 자원이 많이 남는 것을 기준으로 컨테이너를 뽑는다.
(3번은 2개, 4번은 6개)
결국 4번 컨테이너를 고른다.
물론 우선 순위는 따로 지정할 수 있다.
scheduler에서 다뤄야할건 물론 많다.
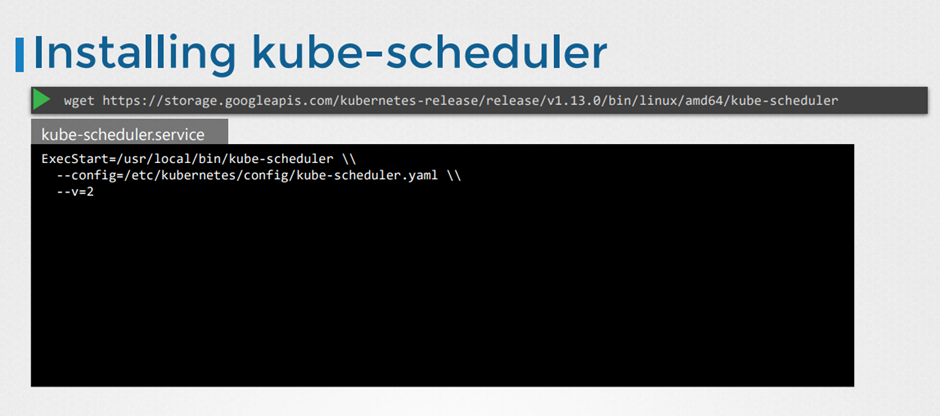
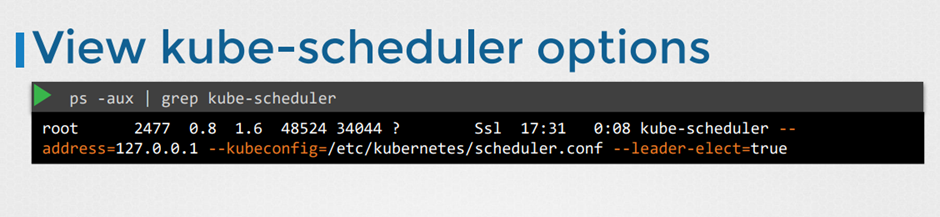
Scheduler 설치하기
설치하기
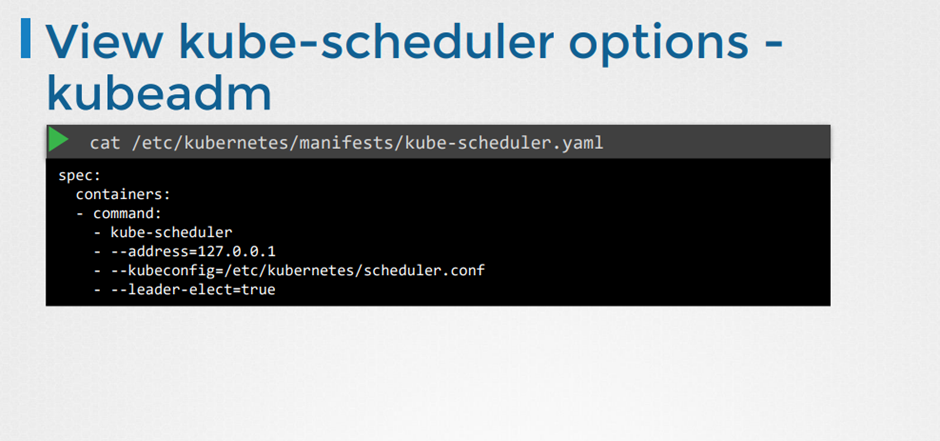
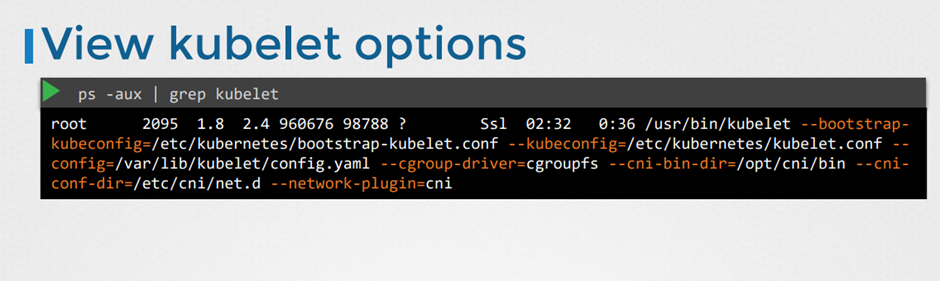
기타 옵션 보기
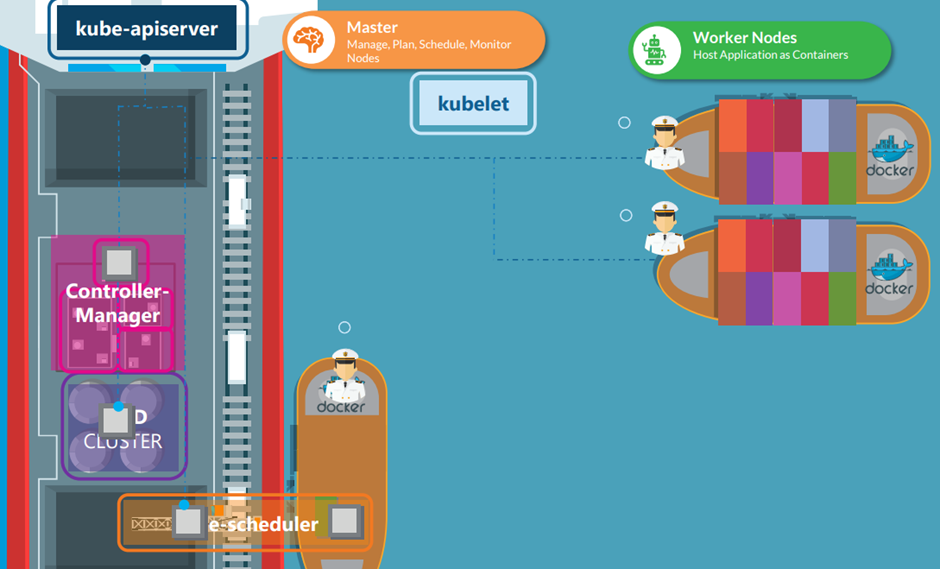
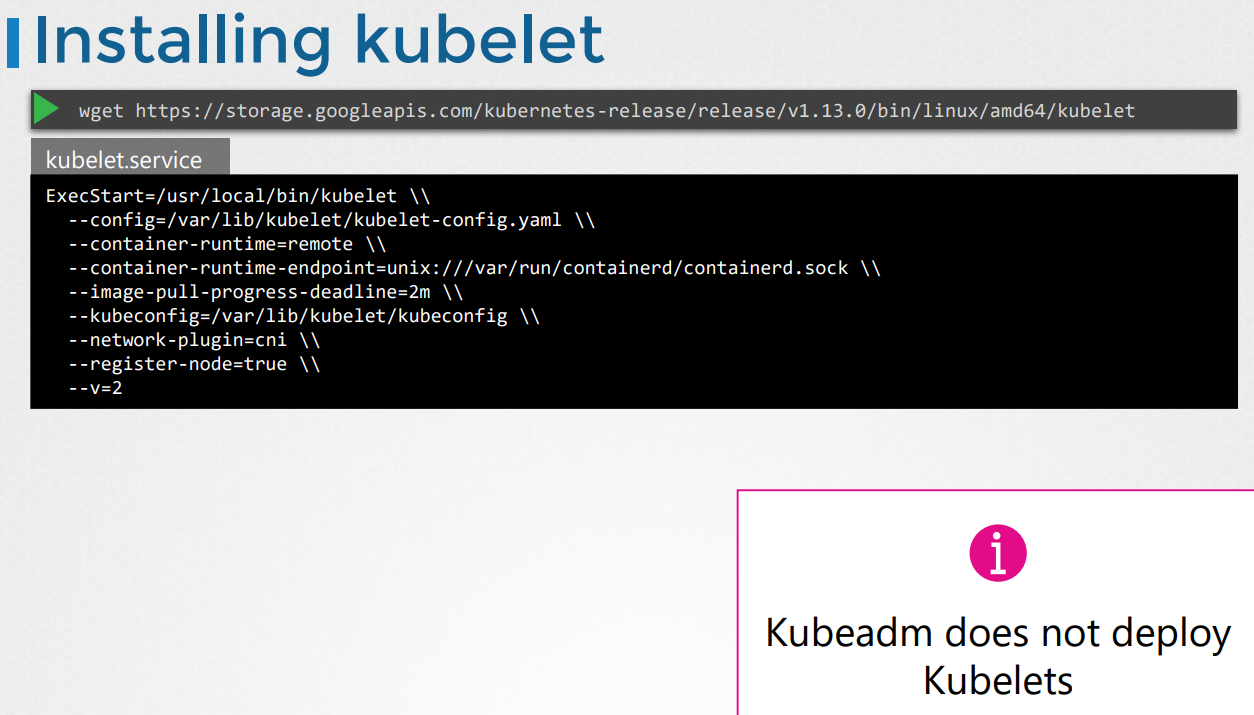
18. Kubelet
큐블렛에 대해 알아보자
각 노드의 선장 역할
Scheduler 가 api를 통해 kublet에게 pod를 설치하라고 한다.
그럼 kublet은 engine( docker) 에게 pod 생성 명령을 내린다.
이후 kublet은 pod를 계속 감시하고 문제가 생기면 api 에게 보고한다 .
Kubeadm tool 을 쓰면 자동으로 kublet을 배포하지 않는다. 다른건 자동으로 하는데 kublet은 다르다 . 수동으로 worker노드에 설치해야한다.
Kublet 보기
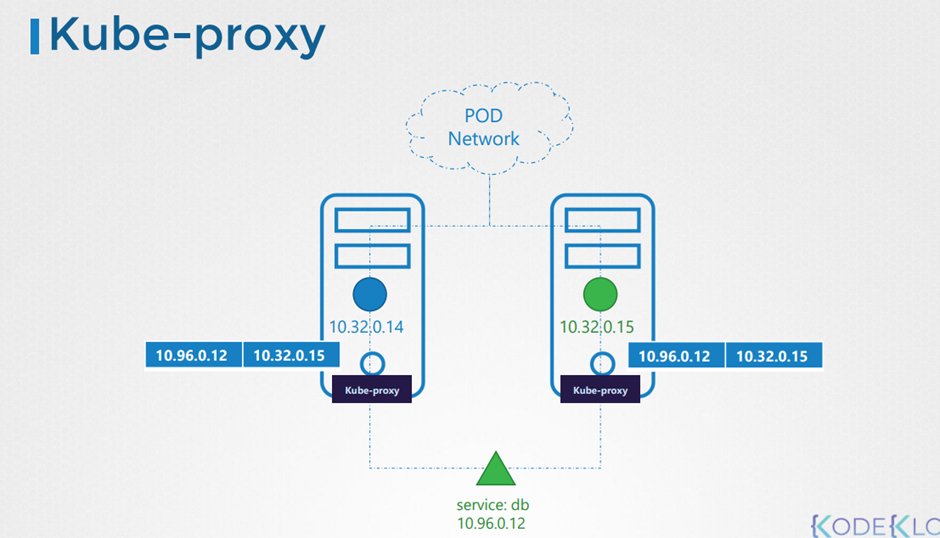
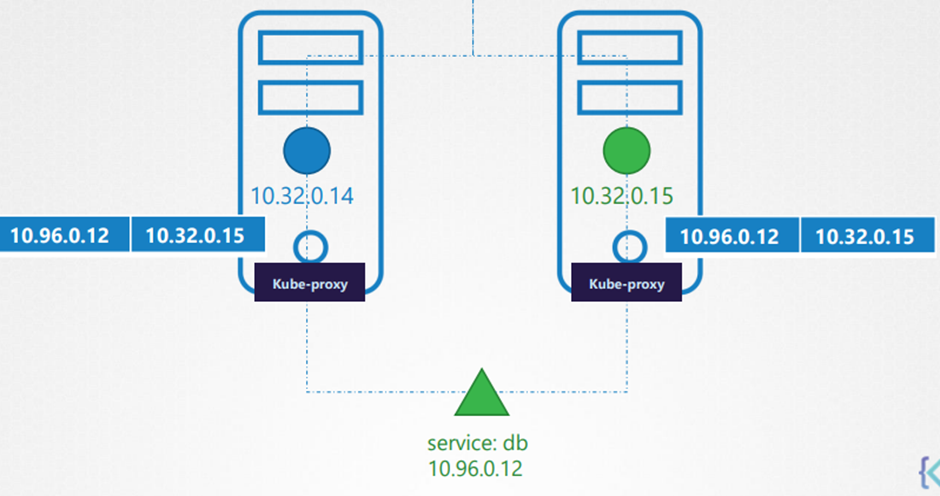
19. Kube Proxy
Kube porxy 에 대해 배워보자
클러스터 내에 있는 모든 pod는 다른 pod와 통신할 수 있다.
Pod network 를 통해서 pod들은 통신한다.
첫째 node는 app을 운영하고 있고 둘쨰 node가 database를 맡는다고 가정하자.
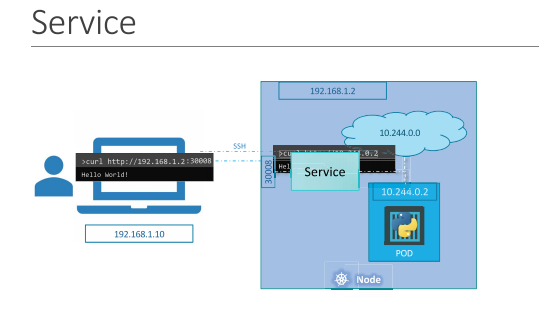
Web app은 db의 ip를 통해서 접근할 수 있다.
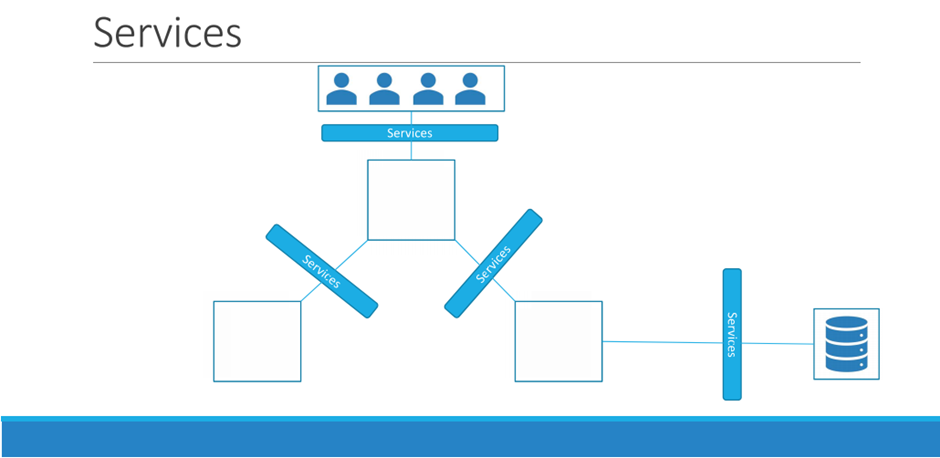
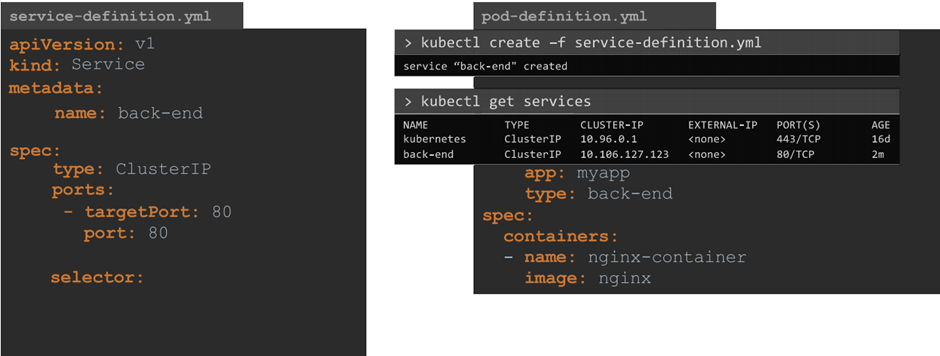
하지만 ip가 바뀔 수도 있기 때문에 service를 만들어서 통신하는 것이 더 효율적이다.
Service도 network 를 통해서 pod 에 접근하는가 ?X
Service는 가상의 컴포넌트이다.
메모리 상에서만 존재 한다. ( no interface)
Kube-proxy is a process that runs on each node in the kubernetes cluster.
Kube proxy 는 새로운 service를 계속 탐색하고
Its job is to look for new services and every time a new service is created it creates the appropriate
rules on each node to forward traffic to those services to the backend pods.
Node에 대해 적절한 트래픽 규칙을 생성한다?
예를 들어 IP 테이블을 생성한다 .( 어떤 식인지는 정확히 모른다 .)
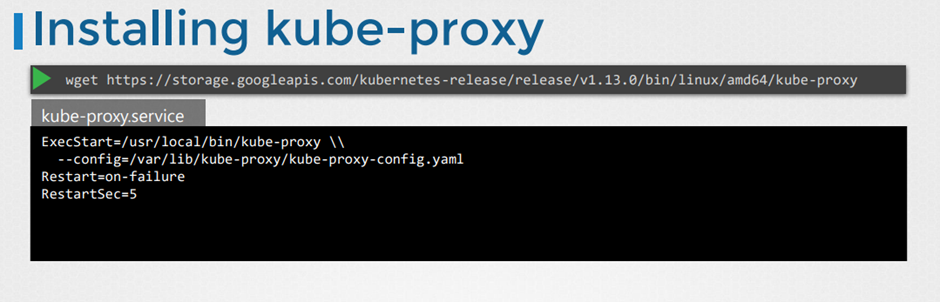
Installing
Proxy 확인하기
20 . Recap – PODS
가정
Application이 이미 개발되고 docker image에 설치 되었다고 가정한다.
또한 쿠버네티스 클러스터가 이미 셋팅되고 돌아가고 있다고 가정
This could be a single node setup or a multi node setup.
상관없음 .
서비스가 돌아가고 있다고 가정
쿠버네티스는 어플리케이션을 컨테이너에 올리는 것으로한다.
쿠버네티스는 직접적으로 컨테이너를 worker noder를 배포하지 않는다 .
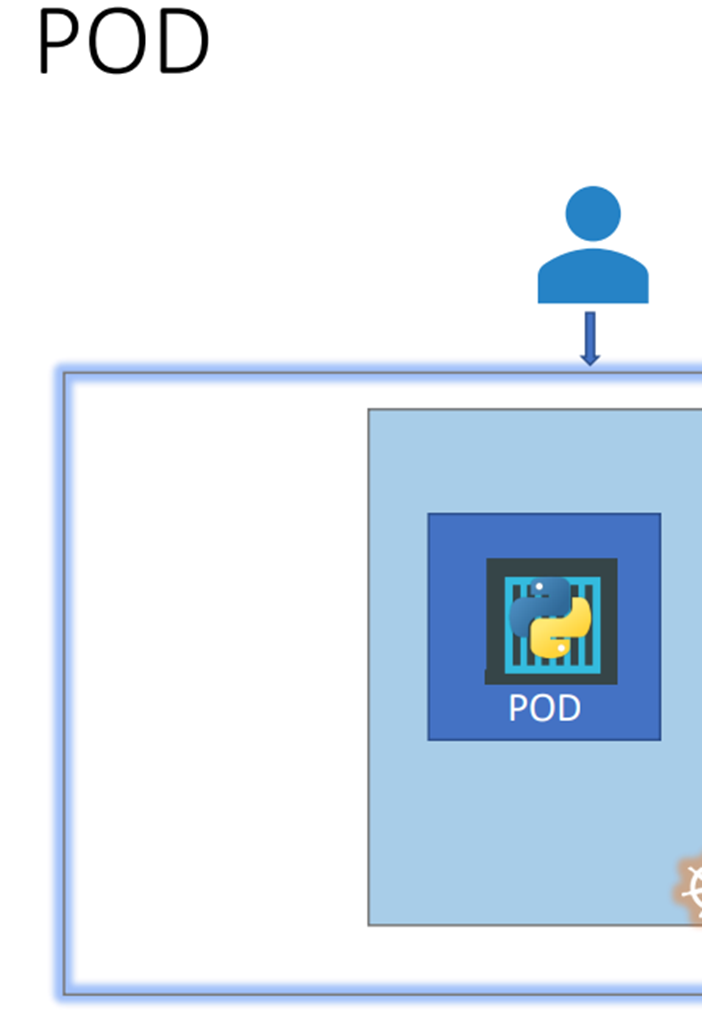
The containers are encapsulated into a Kubernetes object known as pods.
A pod is a single instance of an application.
컨테이너는 pod 로 압축되고 각 node 에 실린다.
Pod는 쿠버 에서 만들수 있는 가장 작은 객체
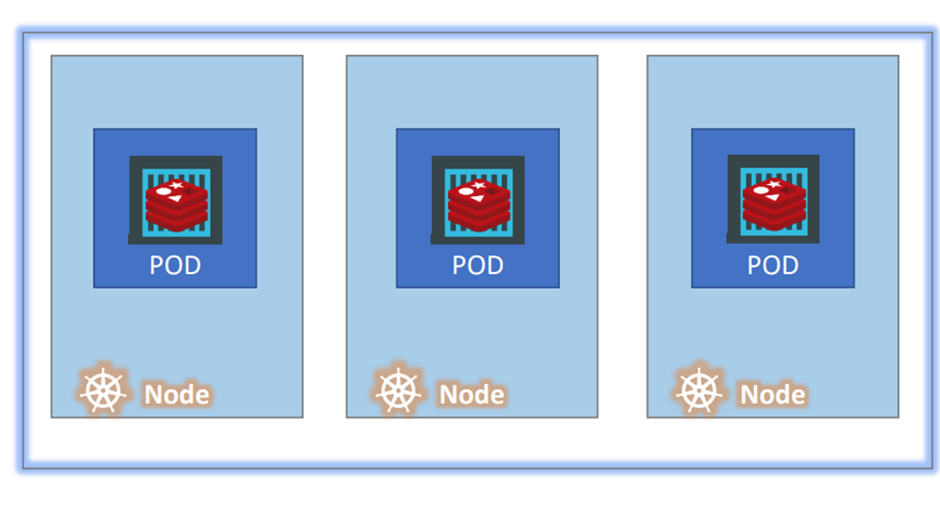
가장 단순한 형태의 서비스가 있다고 치자
Node 안에 단일 pod 가 돌아간다.
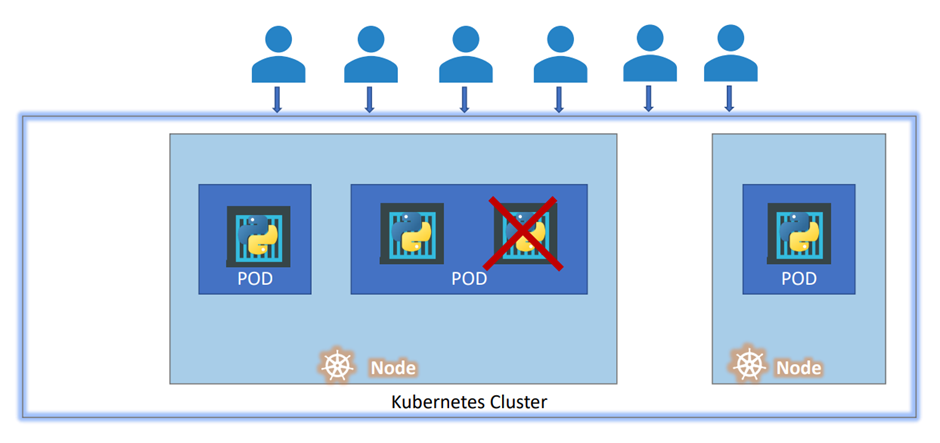
만약 이용자를 추가하면
1번. Pod를 추가한다 .(pod안에 컨테이너를를 추가하지 않는다 .)
2번 node를 추가한다 .
Pod는 컨테이너와 주로 1대1 관계를 맺는다 .
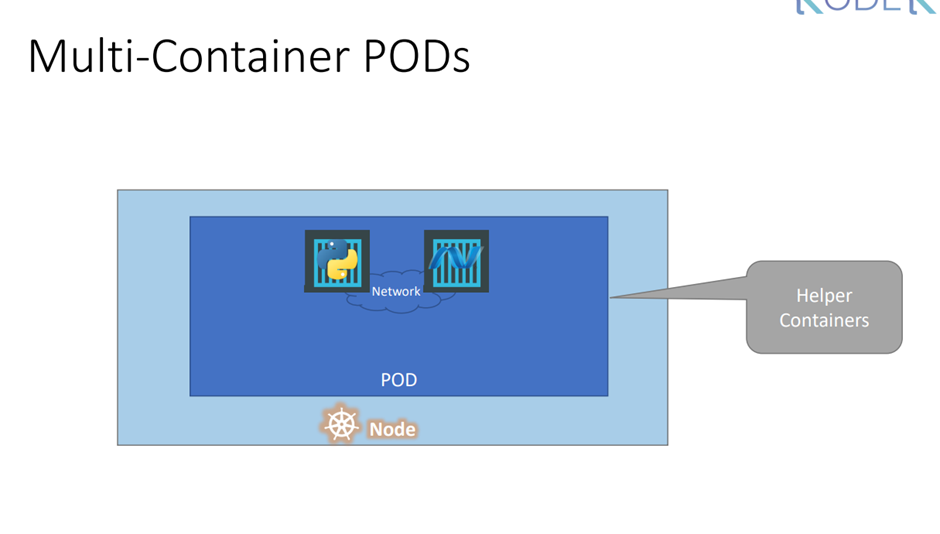
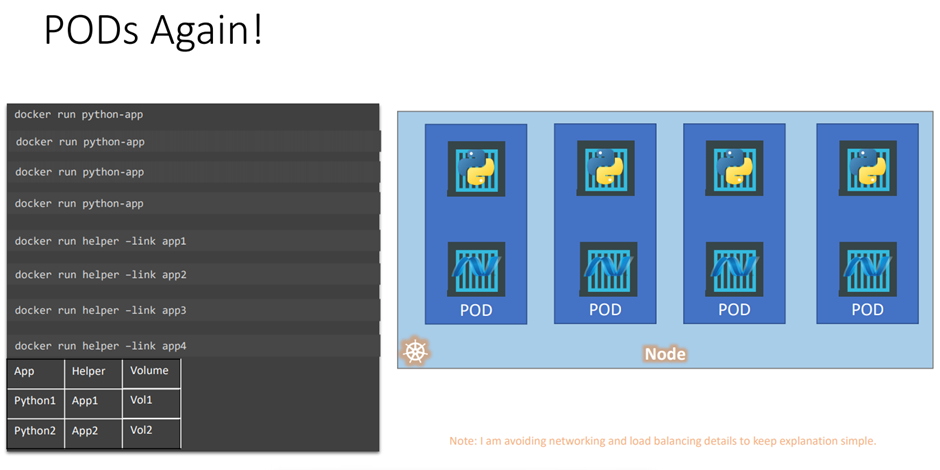
보통 한 pod에 두개 이상의 컨테이너를 넣지 않지만 multi container pods에서는 …
똑같은 컨테이너를 넣기보다 다른 기능을 하는 helper container를 넣는다 .
container들은 또한 통신가능하다.
그냥 컨테이너 1과 helper 컨테이너를 무작위로 추가하면 나중에 컨테이너와 helper 컨테이너에 대한 mapping 정보가 있어야한다.
관리가 복잡해진다.
Pod를 통한 통합관리는 편하다 ( 수동으로 파드에 연결하기)
나중에 확장하기도 편하다.
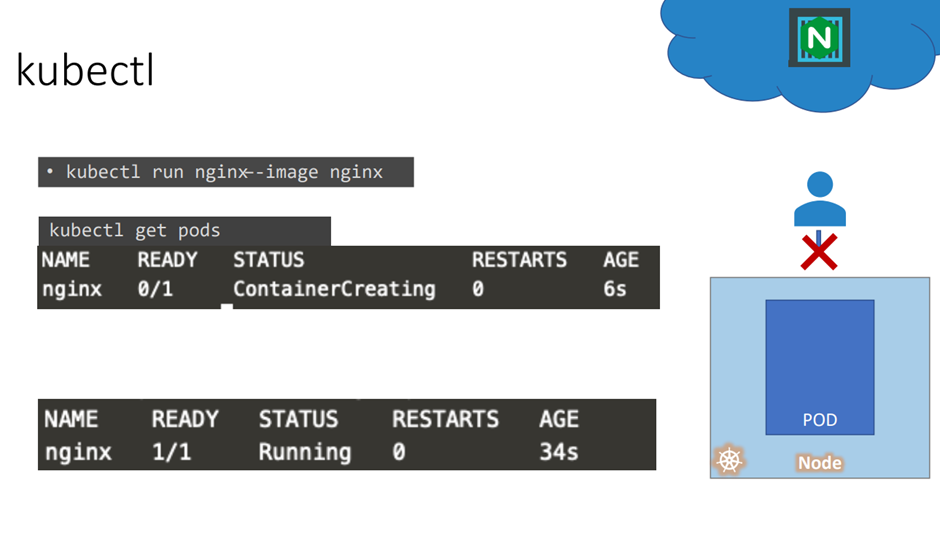
kubectl run nginx 를 하게 되면
먼저 파드가 생성된다. 그리고 nginx 도커 이미지가 배포된다.
It first creates a pod automatically and deploys an instance of the engine x docker image.
설치할때application image에대한정보를줘야한다.
Docker hub로부터 image를 다운받는다 .
Get pods 명령어로 pods 상태를 볼 수 있다.
지금 당장는 user가 Nginx webserver 에 접근할 수 없다.
차후 강의에서 알아본다 .
21. PODs with YAML
In this lecture, we will talk about creating a pod using a YAML based configuration file.
Yaml 파일을 쿠버네티스에 맞게 개발하는 법을 배워볼거다.
Kubernetes uses Yamal files as inputs for the creation of objects such as pods, replicas, deployments,
services, etc. All of these follow a similar structure.
Yaml 파일로 객체, 포드, 레플리카, 배포 등 다 할 수 있다.
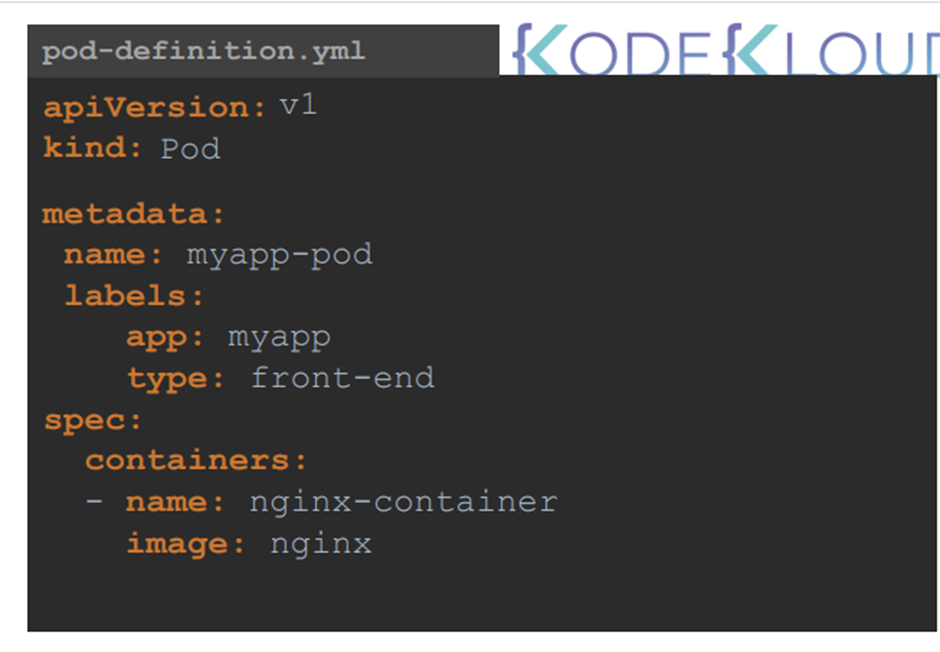
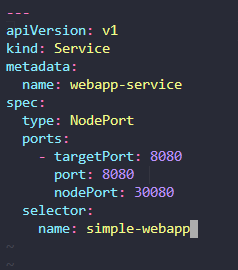
A Kubernetes definition file always contains for top level fields the API version, kind, metadata
and spec.
루트 레벨의 속성이 있는데 먼저 api versrion에 대해 알아보자
apiVersion
우리가 사용하려는 쿠버네티스 api 버전이다.
Pod| v1
Service | v1
ReplocaSet| apps/v1
Deployment | apps/v1
kind
만들려는 객체 종류 ( 여기선 pod를 만들어보자)
Pod, service, replicaSet, deployment 들이 다 객체 종류들이다 .
Metadata
Name, labels 등등
딕셔너리 형태라는 점 .
작성할 때 위치 정렬해서 작성해야한다.
쿠버네티스에서 정해주는 속성들로 label을 사용해야하낟.
Spec
형태는 마찬가지로 딕셔너리 형태
사양을 기술한다.
컨테이너의 사양
아이템에 대한 기술은 ‘-‘로 시작한다.
Yaml 파일을 다 작성하면
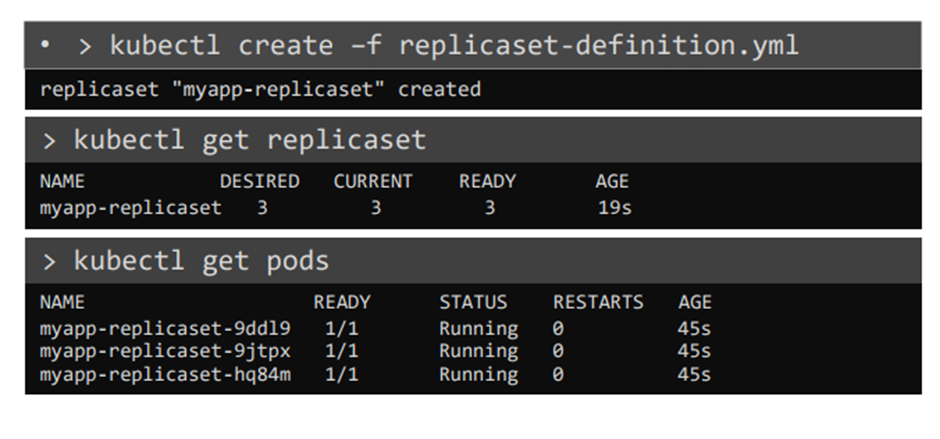
Kubectl create -f pod-definition.yml
4가지 config 속성을 기억하라
Kubectl get pods 명령어로 돌아가는 pods를 확인한다.
Kubectl describe pod myapp-pod
으로 상세 확인
22. Demo - PODs with YAML
Yaml config 파일을 만들어보자
메모장으로도 가능함.
리눅스
Vim pod.yaml
Vi 에디터 열기
apiVesrion: v1
kind:Pod
metadata:
name: nginx
labels:
app: nginx
tier: frontend
spec:
containers:
-name: nginx
image: nginx
cat pod.yaml 로 파일 실행하기
kubectl apply -f pod.yaml
하면
pod/nginx created
라고 뜸
Kubectl get pods 로 상태확인
Kubectl describe pod nginx
로 상세확인하기
23. pratcie test introduction
시험 안내
24. Demo: Accessing Labs
Kodekloud 로 가서 시험처야한다.
26. Practice Test - Pods
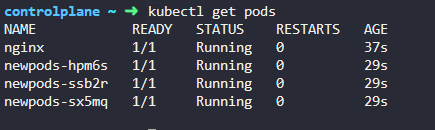
1.How many pods exist on the system?
0개
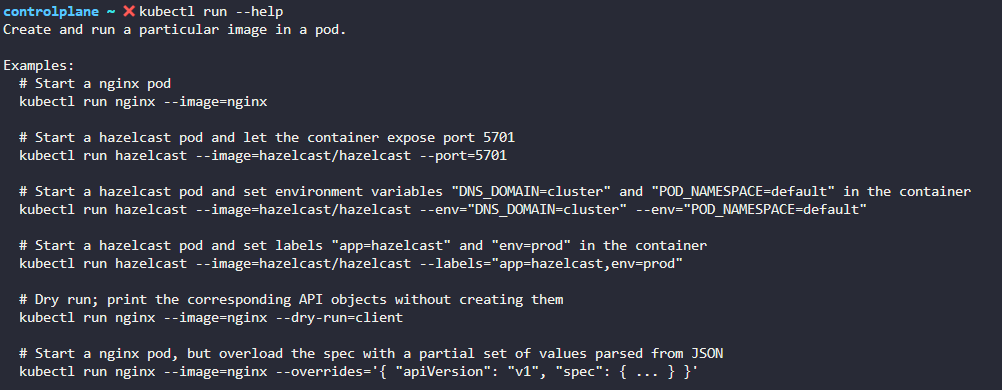
2. Create a new pod with the nginx image.
잘 모를 때에는 kubectl run --help 를 통해서 찾아보자
3. How many pods are created now?
4개입니다!
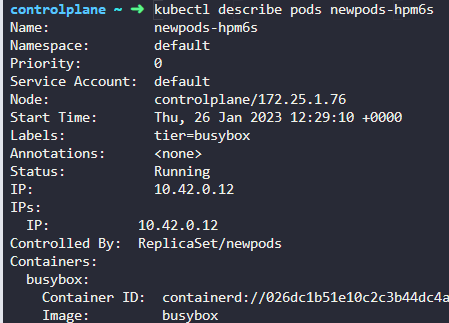
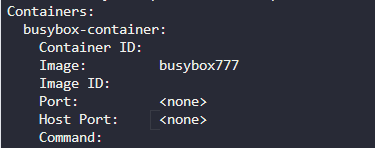
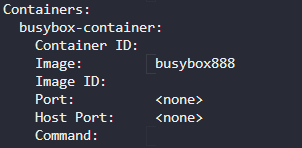
4. What is the image used to create the new pods?
You must look at one of the new pods in detail to figure this out.
image 는 busybox 이다.
5. Which nodes are these pods placed on?
controlplane/172.25.1.76
위에서 확인 가능
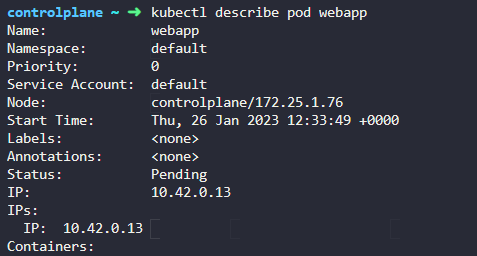
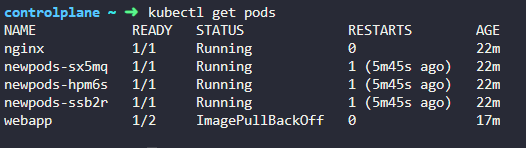
6. How many containers are part of the podwebapp?
Note: We just created a new POD. Ignore the state of the POD for now.
들어가서 확인한다.
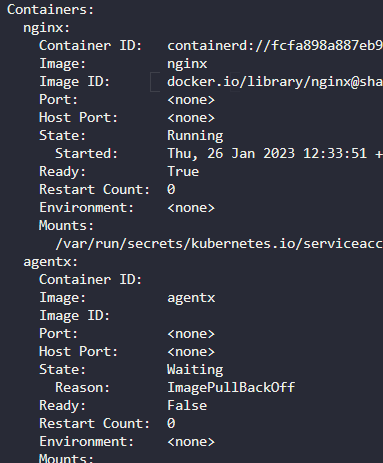
7. What images are used in the new webapp pod?
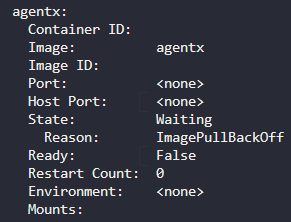
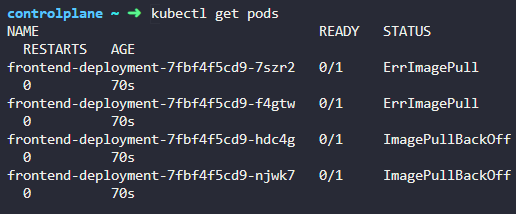
niginx 와 agentx 를 사용8. What is the state of the container agentx in the pod webapp?
error or waiting
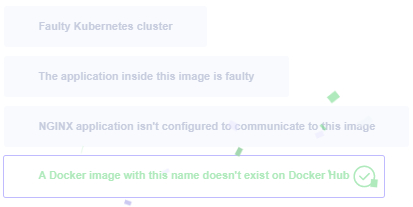
9. Why do you think the container agentx in pod webapp is in error?
ImagePullBackOff
도커 허브에서 이미지를 찾을 수 없음.
10. What does the READY column in the output of the kubectl get pods command indicate?
실행중인 컨테이너/ 전체 컨테이너 수
11. Delete the webapp Pod.
12. Create a new pod with the nameredisand with the imageredis123.
Use a pod-definition YAML file. And yes the image name is wrong!
yaml 파일 먼저 생성
create -f 로 강제 실행 시키기.
13. Now change the image on this pod toredis.
Once done, the pod should be in arunningstate.
vi 에디터로 이미지 이름 변경하고
kubectl apply -f redis.yaml 로 적용하면 된다.
28. Recap – ReplicaSets
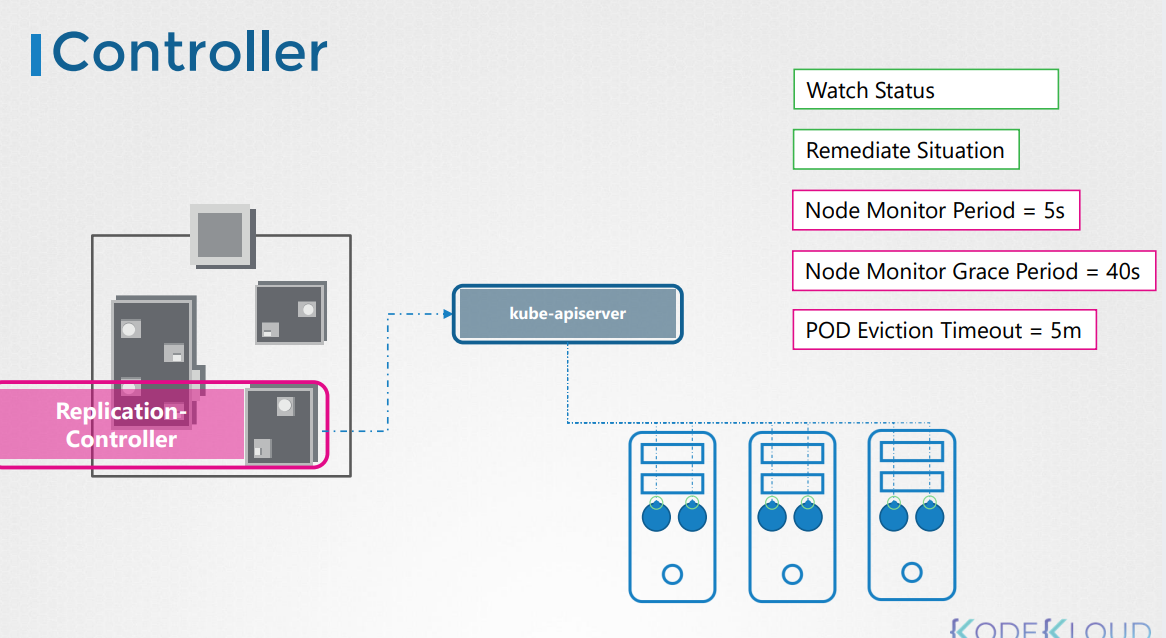
Controllers are the brain behind Kubernetes.
They are the processes that monitor Kubernetes objects and respond accordingly.
Replica 와 replication controller의 역할
고가용성 High Availability
The replication controller helps us run multiple instances of a single part in the Kubernetes cluster,
thus providing high availability.
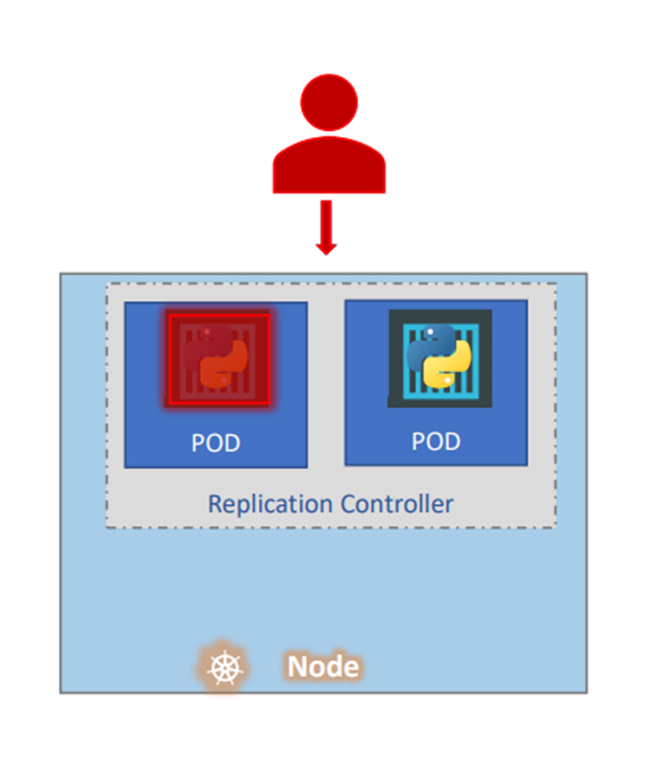
Pod 가 돌아가지 않는 상황을 대비해서 pod를 하나 더 돌린다고 생각하자
Replication controller 가 pod 두개 돌리는 것을 도와준다.
만약 단일 pod 시스템에서 replication cotroller를 사용하지 못하는가 ?
단일 pod에서 replication controller 사용가능하다 .
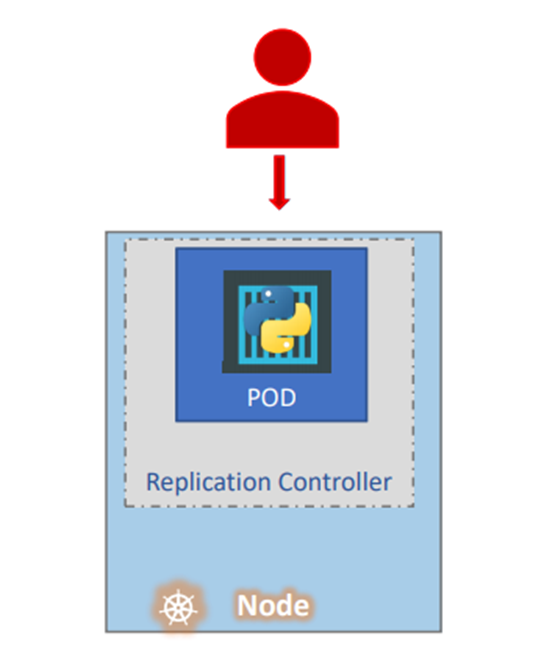
Even if you have a single pod, the replication controller can help by automatically bringing up a new
pod when the existing one fails.
Pod 에 문제 생기면 자동으로 pod를 생성한다 .
Thus the replication controller ensures that the specified number of pods are running at all times,
Replication controller는 정해진 pod 수만큼 돌아가도록 유지하는 역할
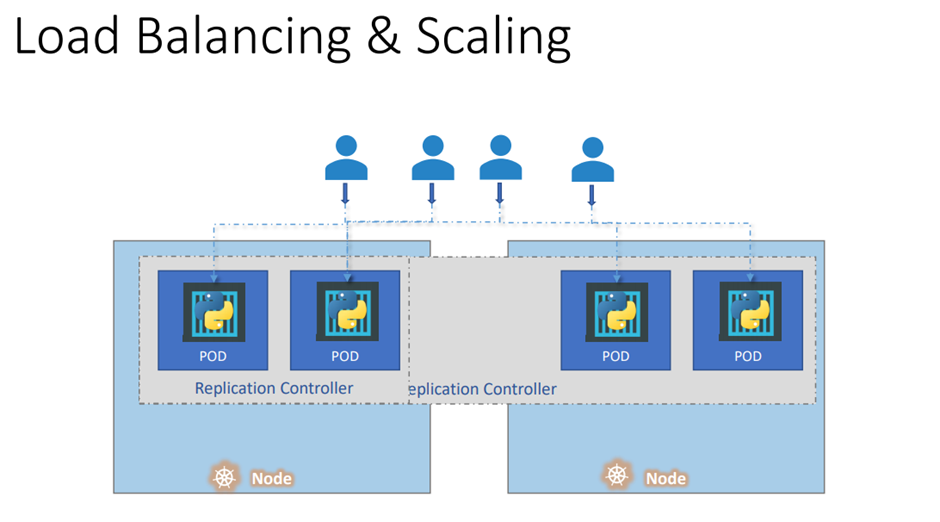
로드밸런싱과 스케일링 Load Balancing & Scaling
Load balancing 에 있어서 replication controller 가 수행한다.
유저가 늘어나면 pod를 늘리다가 다른 노드에 걸쳐 pod를 확장한다.
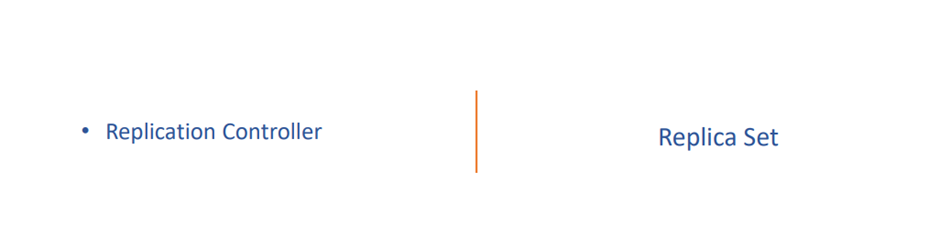
Replication controller. Replica set 같은 목적을 가지지만 엄밀히 다르다 .
Replication controller is the older technology that is being replaced by replica set.
Replica set is the new recommended way to set up replication.
옛날엔 replication controller를 사용했다면 지금은 replica set 으로 한다.
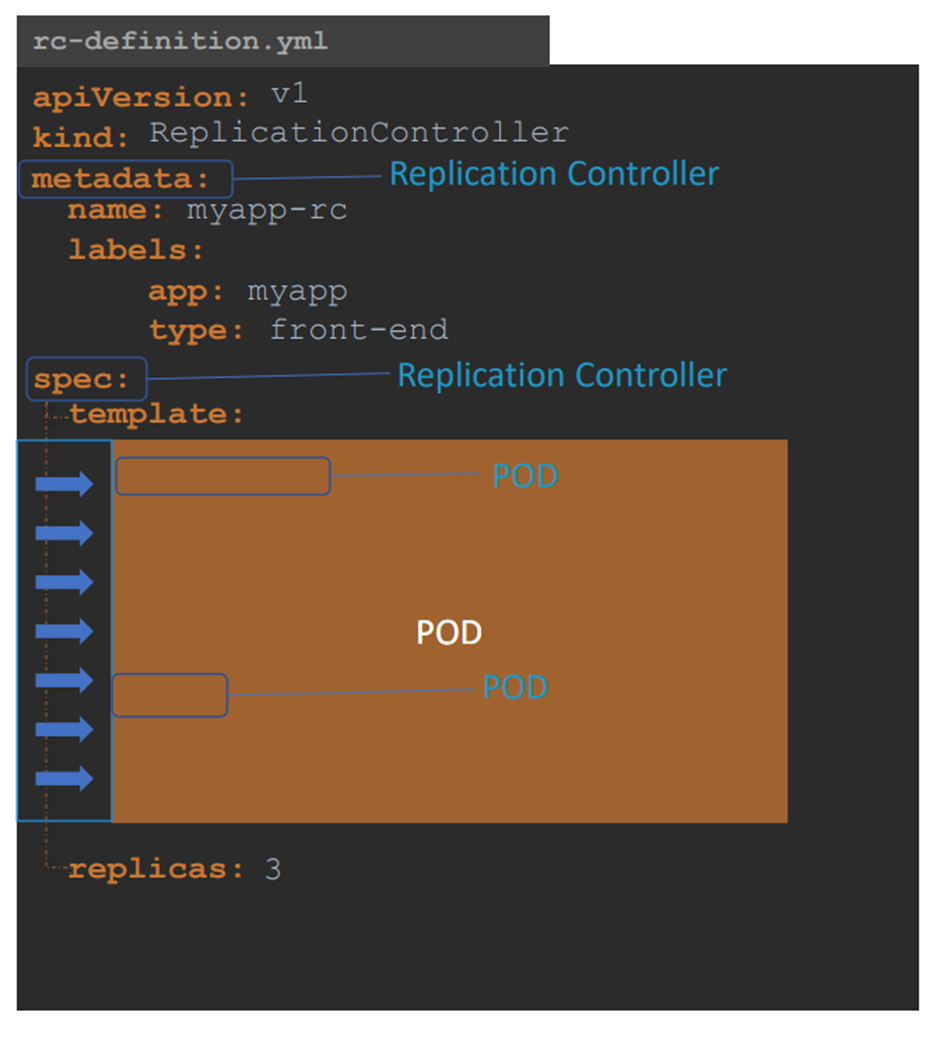
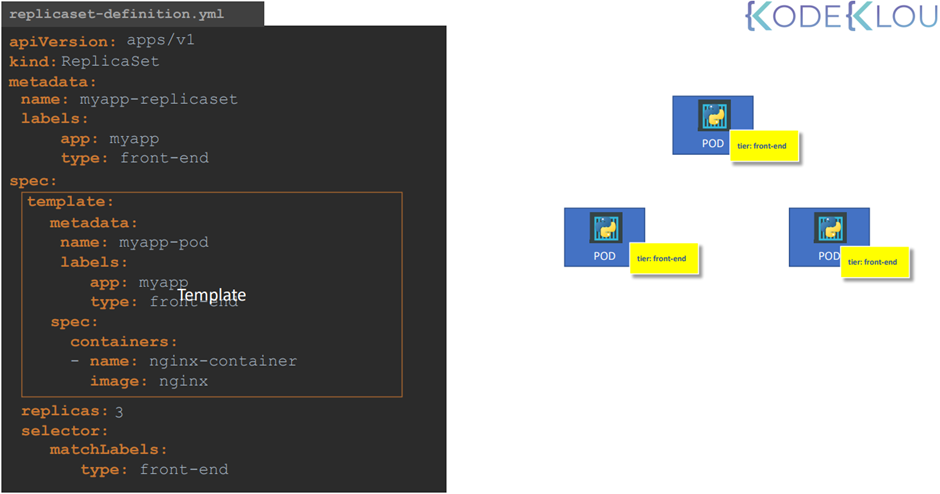
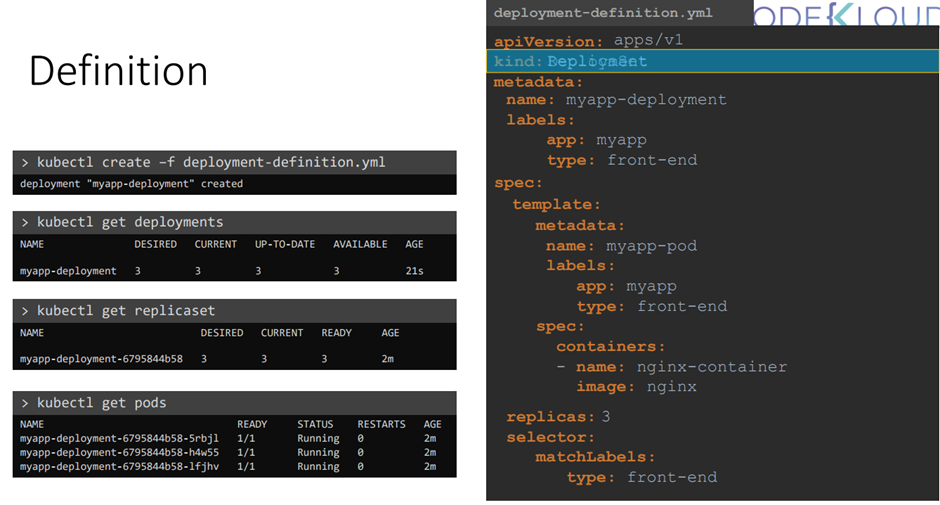
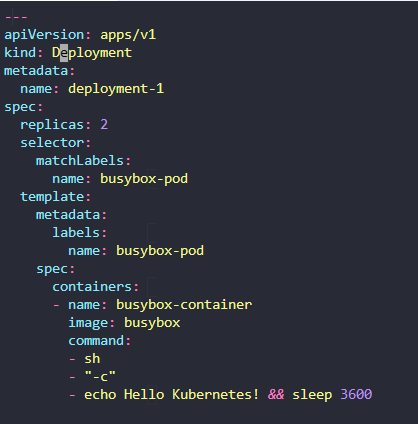
Replication controller에 대한 yaml 파일을 만들자
4 대 속성
ApiVersion, kind , metadata, spec
Spec 작성이 조금 다르다 .
Template을 통해 정의한다.
Spec -> template -> (metadata, spec ) 정의
그렇게 하면 metadata 가 두개 생긴다.
하나는 replication controller 에 대한 metadata
두번째는 pod 에 대한 metadata
Replica 개수에 대해서도 정의해야한다
Spec 아래의 template와 replica 는 형제 사이다.
같은 라인에 두자!
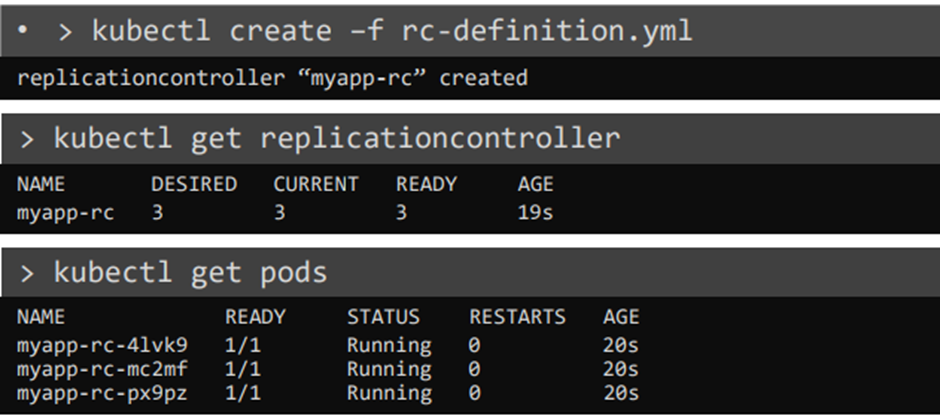
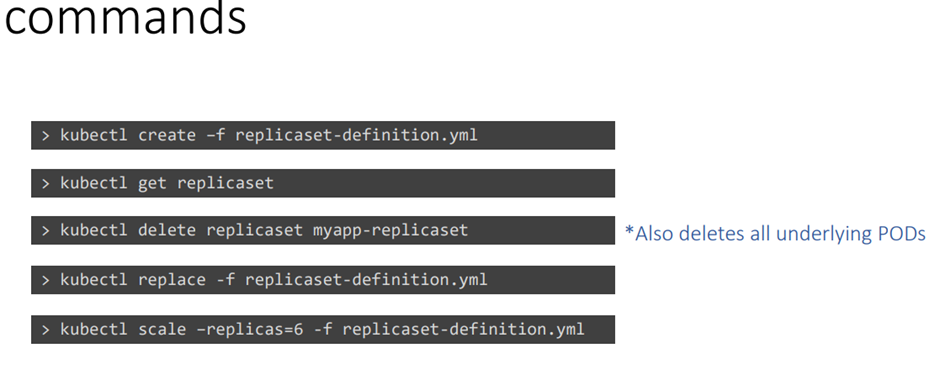
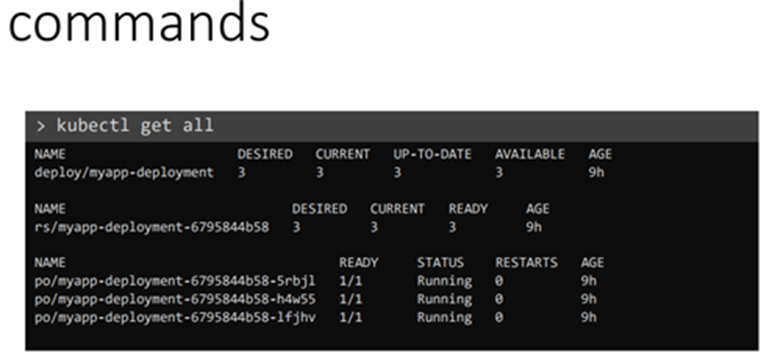
r-c 생성과 가져오기, pod 확인하기
상기의 방법은 replication controller를 사용한 방법이다.
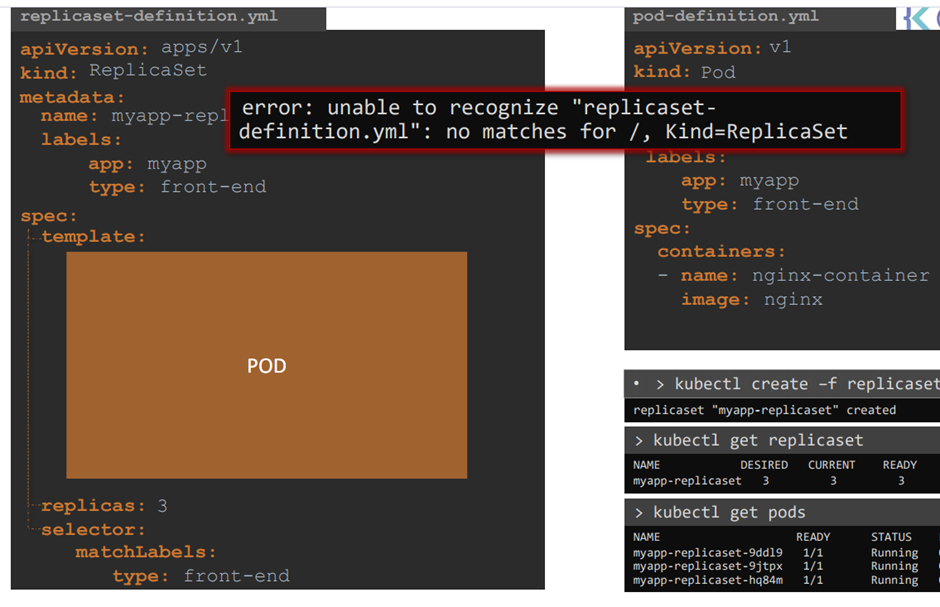
version 을 apps/v1 으로 명시
ReplicaSet
그리고selector를 필요로 한다 .
생성하기
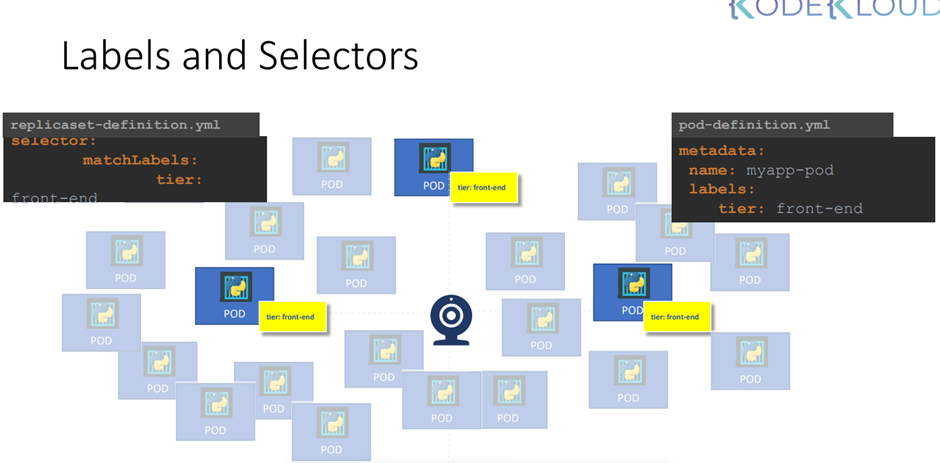
Labels and selector에 관하여
Pod 세개를 이용하는 web application 이 있다고 가정하자
r-c 또는 replica는 3개의 pod이 돌아가고 있다고 보장해야한다.
Replica set은 pod을 모니터링 한다.
Replica set 은 어느 pods을 감시해야하는지 어떻게 알까?
Labeling 이 중요한 이유
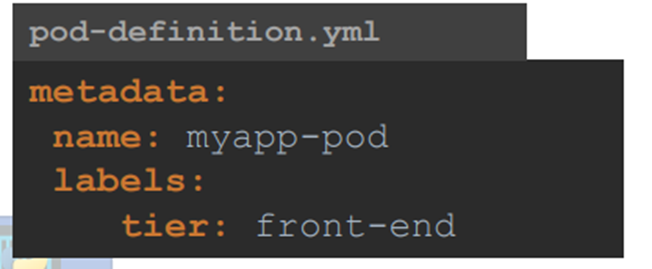
Pod 에서 labels 를 정의한다.
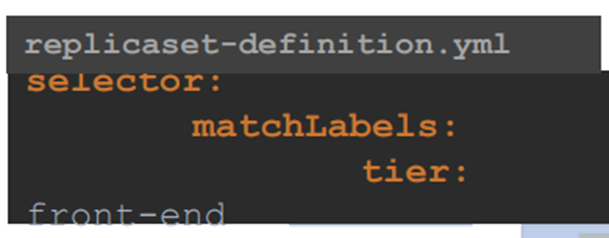
Selector matchlables에서 모니터링할 labels 을 명시하면 된다 .
This way the replica set knows which pods to monitor.
쿠버네티스에서 위와 같은 방식으로 많이 작동한다.
3개의 pod가 돌아가고 있다고 치자
R-c 와 replica set의 차이점
r-c 에는 어떤 pod 를 연결해야할지 명시되어있지 않기 때문에 새로 만든다.
Replica set 에는 matching labels 이 있으니까 연결한다 .
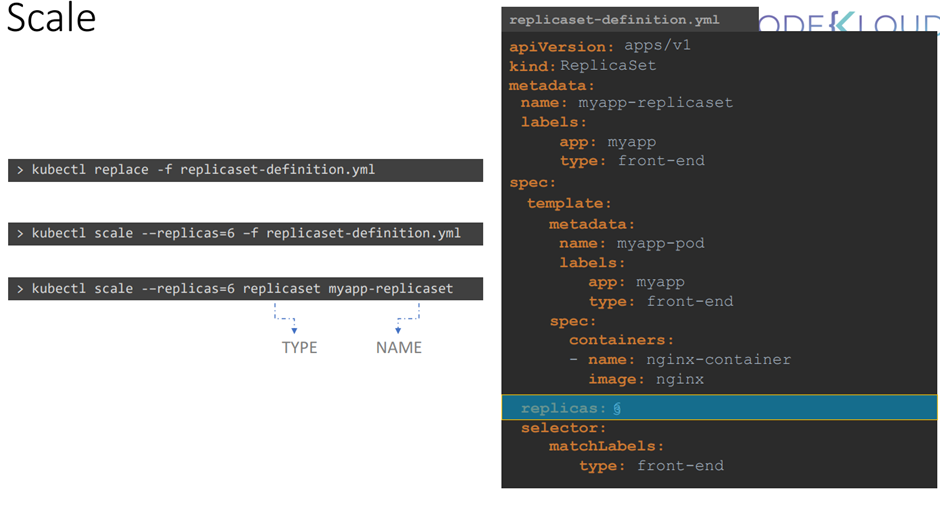
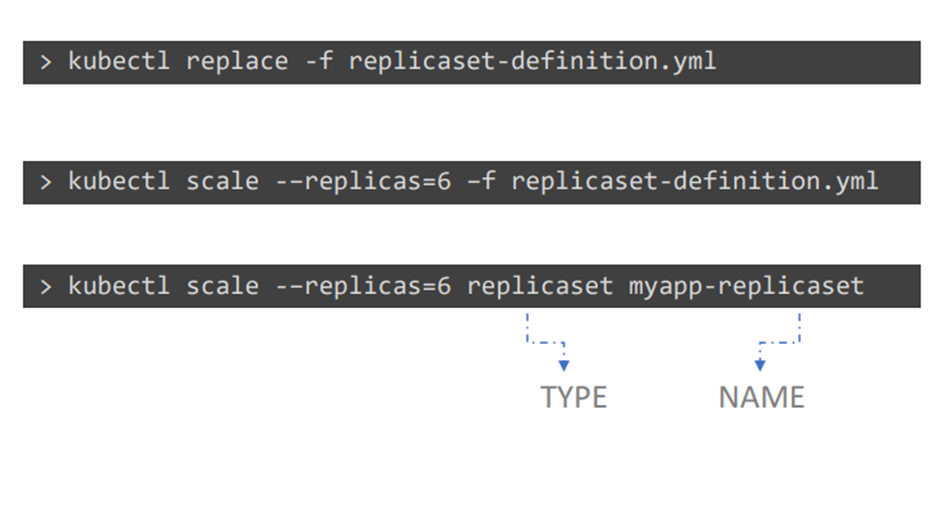
Replica 수를 변경하는 방법 세가지
1번 yaml 파일로가서 숫자 변경
2,3 scale 명령어를 사용하기
3번째에 replicaset을 제거하면서 pod 도 제거한다.
29. Practice Test - ReplicaSets
시험을 보자
1. How many PODs exist on the system?
kubectl get pods
2. How many ReplicaSets exist on the system?
kubectl get ReplicaSets
3. How about now? How many ReplicaSets do you see?
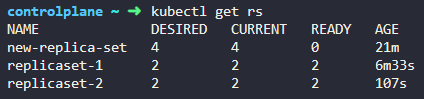
4. How many PODs are DESIRED in thenew-replica-set?
4개
5. What is the image used to create the pods in thenew-replica-set?
describe로 찾기
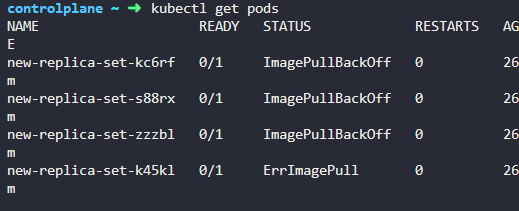
6. How many PODs are READY in thenew-replica-set?
0
7. Why do you think the PODs are not ready?
image 문제
8. Delete any one of Pods .
kubectl delete pods --all
9. How many PODs exist now?
4
10. Why are there still 4 PODs, even after you deleted one?
레플리카셋에서 지정했으므로
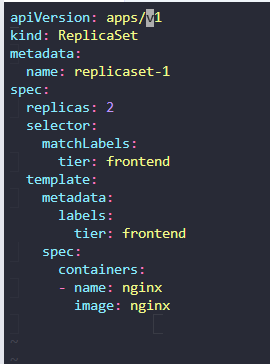
11. Create a ReplicaSet using thereplicaset-definition-1.yamlfile located at/root/.
There is an issue with the file, so try to fix it.
1) ls 로 확인
2) kubectl create -f replicaset-definition-1.yaml 명령어로 강제 실행
error: resource mapping not found for name: "replicaset-1" namespace: "" from "replicaset-definition-1.yaml": no matches for kind "ReplicaSet" in version "v1" ensure CRDs are installed first
3) vi replicaset-definition-1.yaml 로 확인
vi 로 열어서 수정하자
apps/v1 으로
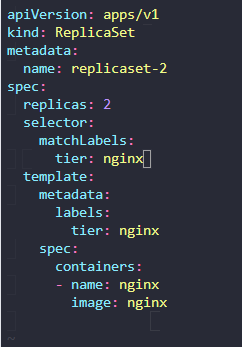
12. Fix the issue in thereplicaset-definition-2.yamlfile and create aReplicaSetusing it.
kubectl create -f replicaset-definition-2.yaml 강제 실행하면
The ReplicaSet "replicaset-2" is invalid: spec.template.metadata.labels: Invalid value: map[string]string{"tier":"nginx"}: `selector` does not match template `labels`
tier를 nginx 로 맞춰주자
13. Delete the two newly created ReplicaSets -replicaset-1andreplicaset-2
kubectl get rs 로 레플리카셋을 먼저 확인
kubectl delete rs replicaset-1
레플리카셋 삭제하기
14.
Fix the original replica setnew-replica-setto use the correctbusyboximage.
Either delete and recreate the ReplicaSet or Update the existing ReplicaSet and then delete all PODs, so new ones with the correct image will be created.
rs 수정하기
kubectl edit rs new-replica-set
image busybox777 에서 busybox 로 수정
수정해도 파드가 실행되지 않는다. 기존의 파드들을 삭제하고
rs 가 다시 파드를 생성할때 수정된 이미지로 생성된다.
파드를 삭제하자!
15.
Scale the ReplicaSet to 5 PODs.
Usekubectl scalecommand or edit the replicaset usingkubectl edit replicaset.
kubectl scale rs new-replica-set --replicas=5
레플리카 수 늘리기
16.
Now scale the ReplicaSet down to 2 PODs.
Use thekubectl scalecommand or edit the replicaset usingkubectl edit replicaset.
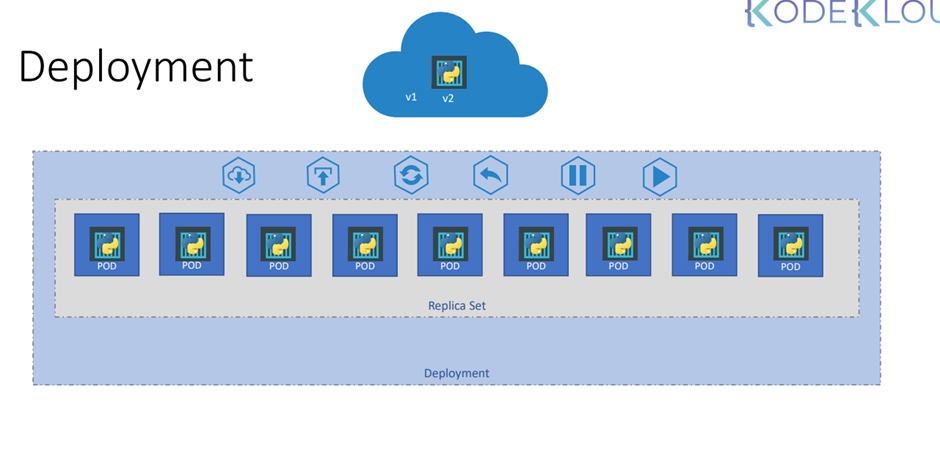
31. Deployments
Webserver를 운영하고 있다고 가정하자.
각 instance들이 운영되고 있는데 새로운 버전의 애플리케이션이 완성되면 인스턴스에 해당 사항을 업그레이드 해야한다.
한번에 업데이트하는 것이 아니라 인스턴스를 하나씩 교체하면서 업그레이드 하는 것을 rolling updates 라고 한다.
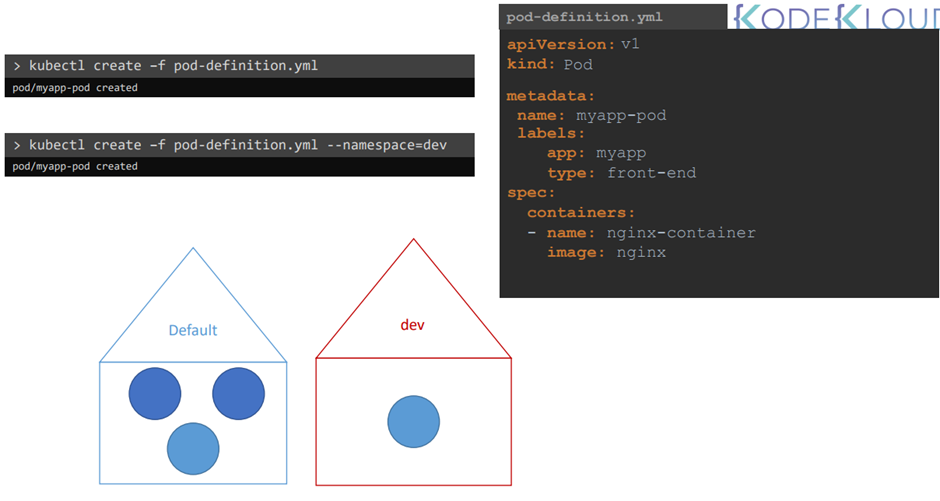
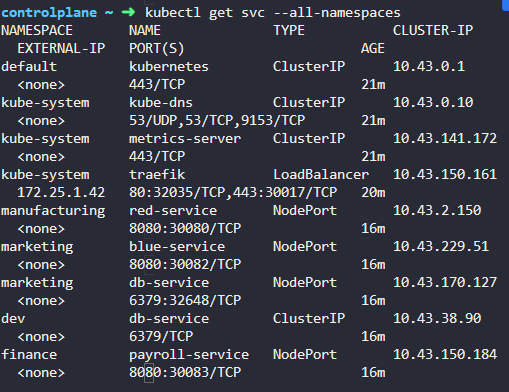
kubectl run redis --image=redis --namespace=finance -o yaml
4. Which namespace has thebluepod in it?
kubectl get pods --all-namespaces
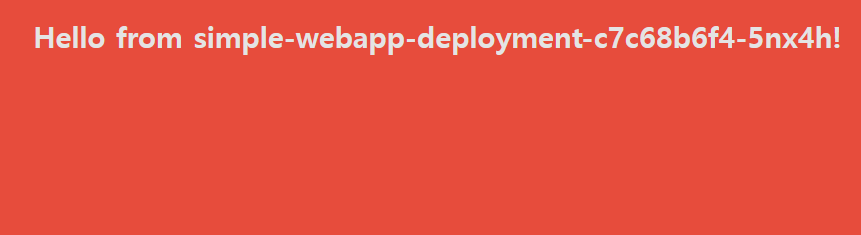
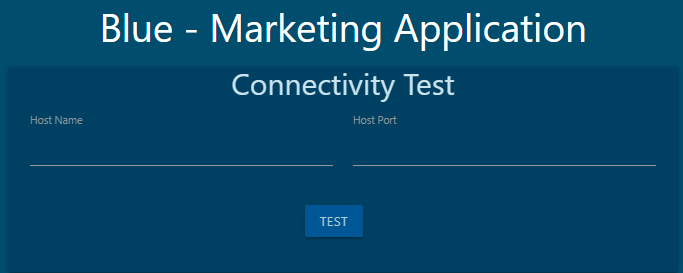
5. Access theBlueweb application using the link above your terminal!!
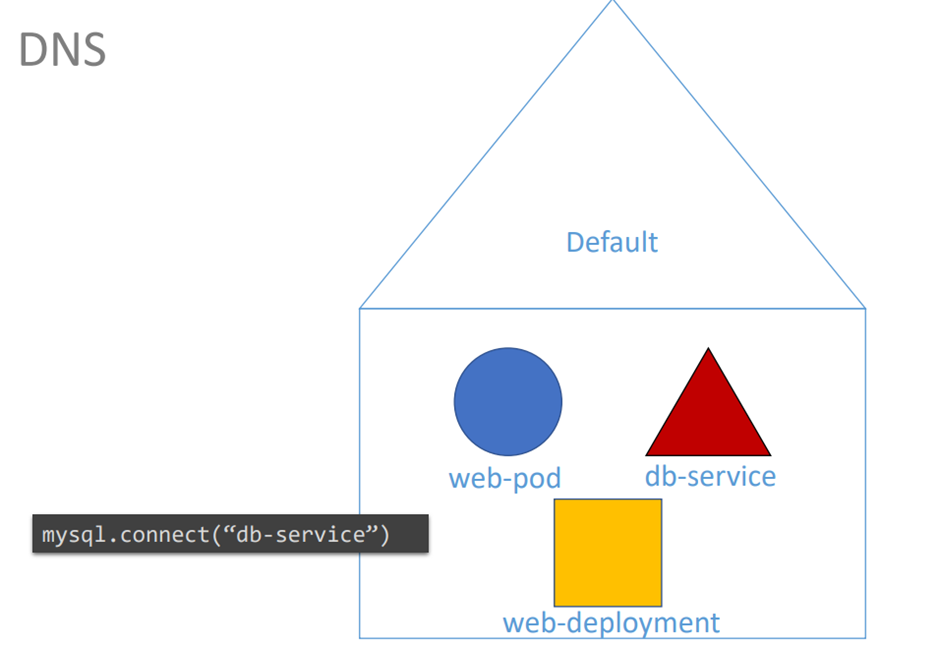
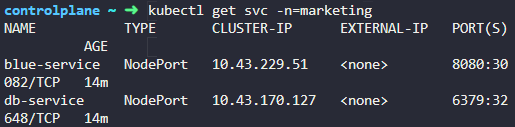
6. What DNS name should theBlueapplication use to access the databasedb-servicein its own namespace -marketing?
You can try it in the web application UI. Use port6379.
같은 네임스페이스에서 dns는 name 으로 할 수 있다.
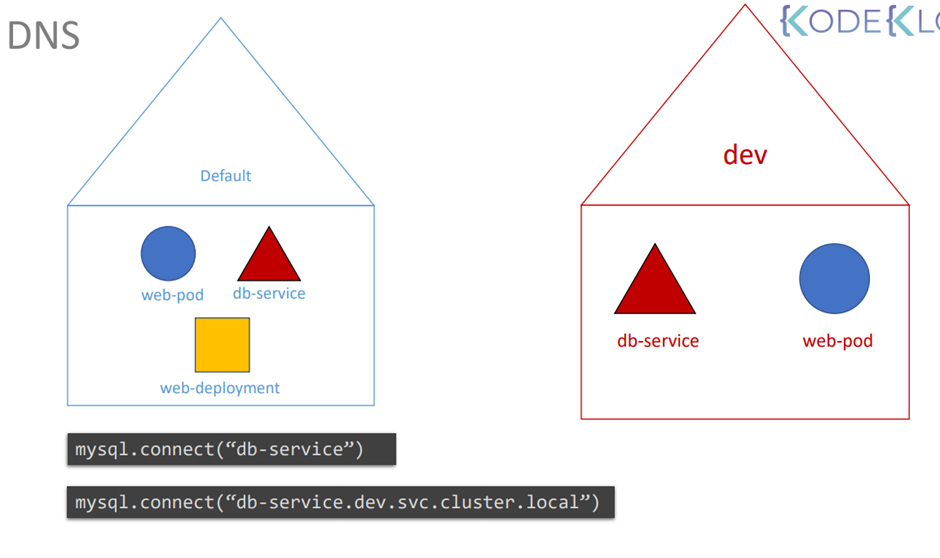
7. What DNS name should theBlueapplication use to access the databasedb-servicein thedevnamespace?
You can try it in the web application UI. Use port6379.
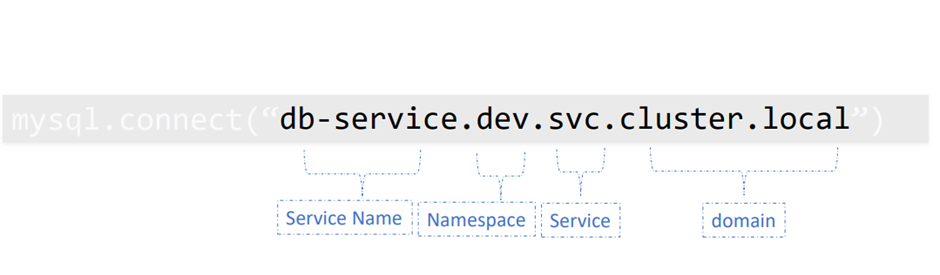
db-service.dev.svc.cluster.local
이름.네임스페이스.타입.~
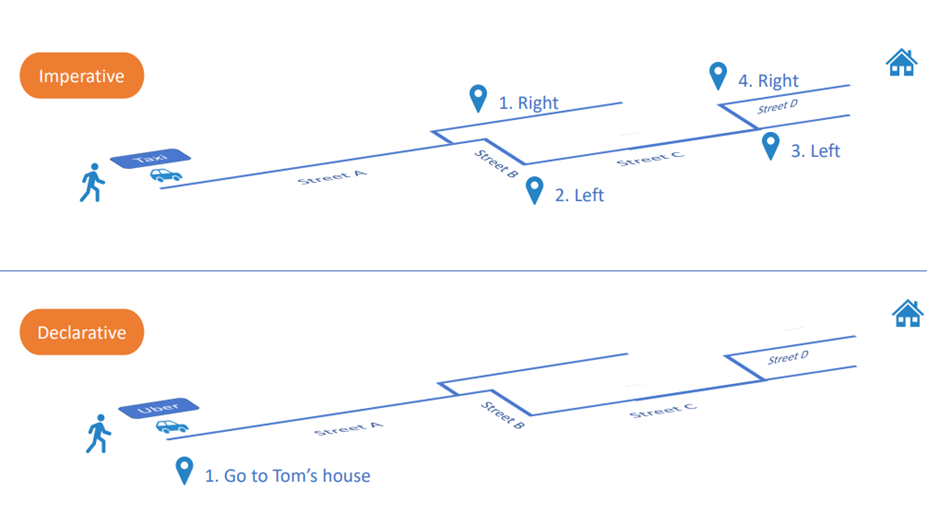
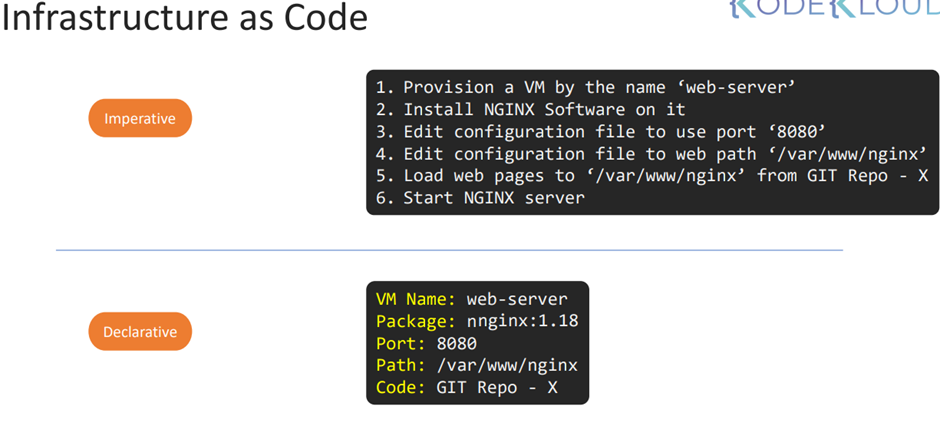
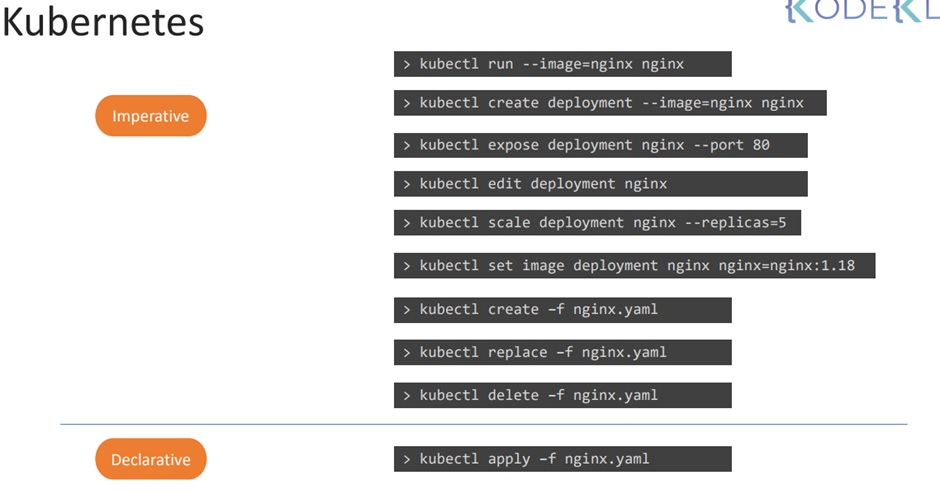
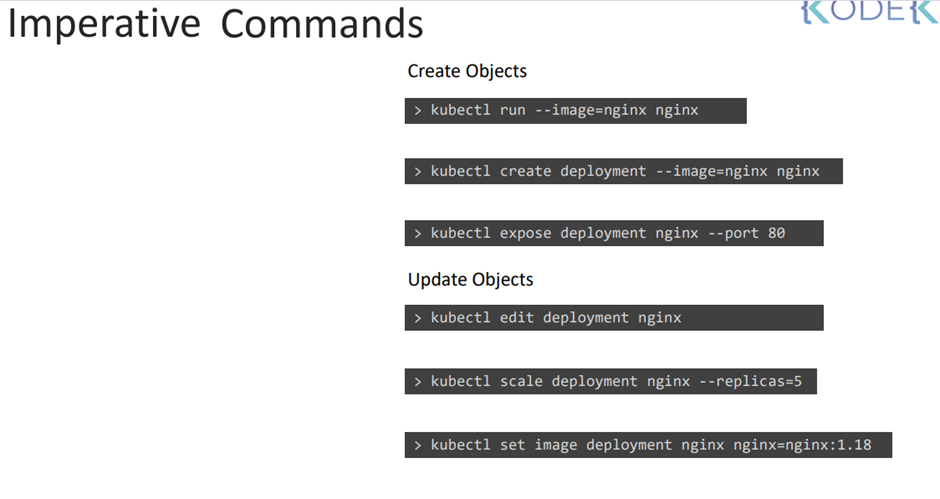
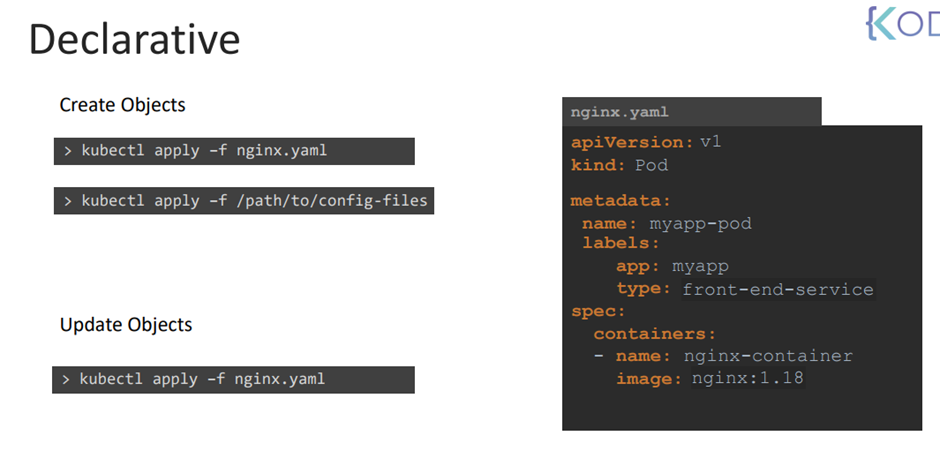
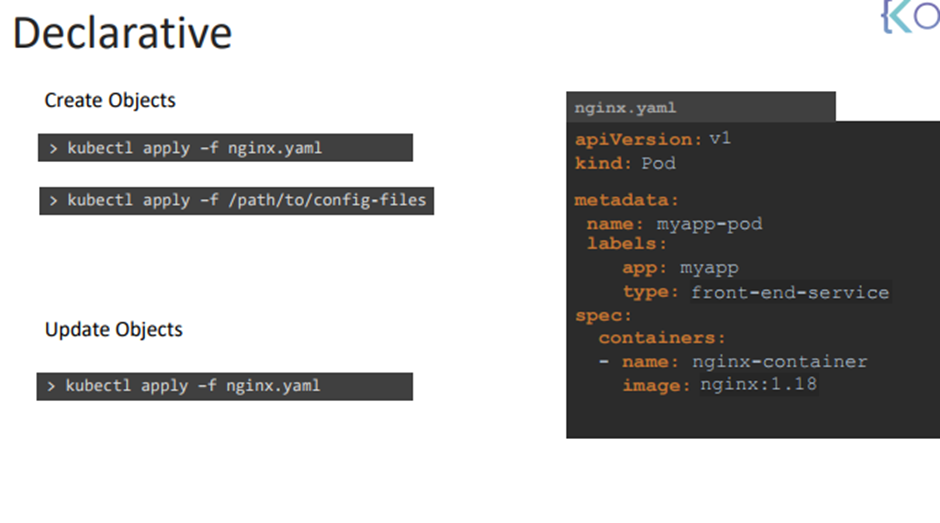
43. Imperative vs Declarative
Imperative는 방법에 집중
Declarative는 목적지에 집중
Imperative는 하나 하나 명시해야하나
Declarive는 선언적
Declarive는 명료하다.
업그레이드에 용이하다.
Imperative 는 손이 많이 간다.
Imperative 한 방법으로 생성하면 기록을 확인하기 어렵다.
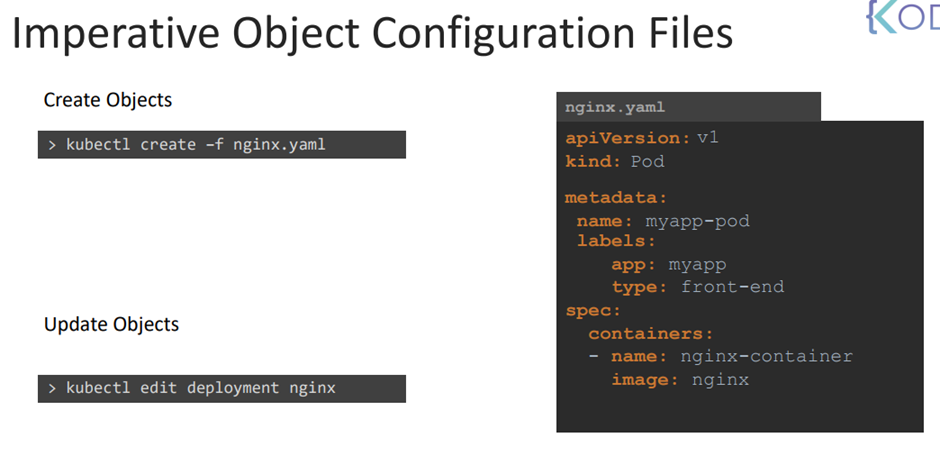
만약 kubectl 로 수정한다면 kube 메모리 상에서만 변경 사항이 저장된다.
실제 yaml 파일이 변경되지 않는다.
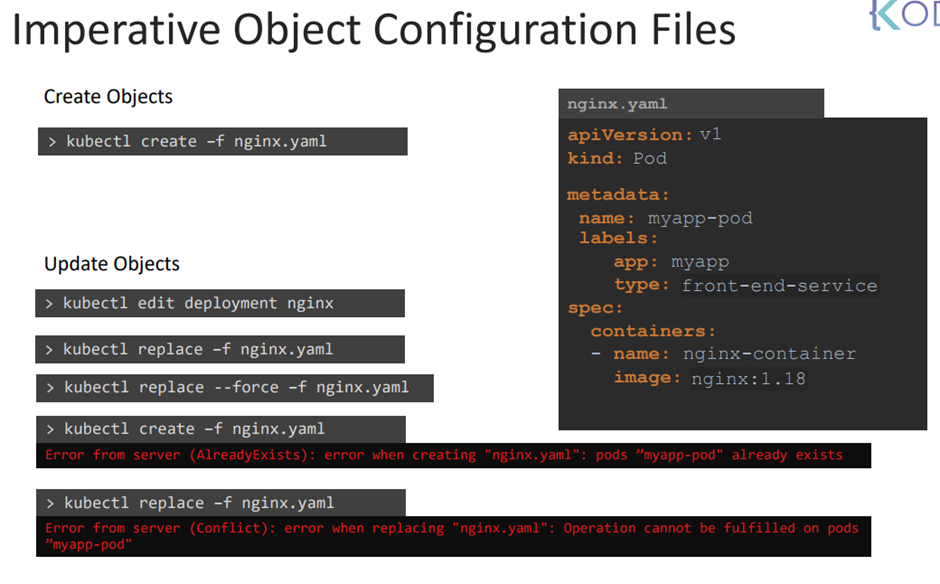
replace를 통해 파일을 교체 -> local yaml 파일도 변경된다.
--force 통해 삭제?
명령형에서는 객체를 업데이트할떄 먼저 객체가 돌아가는지 확인해야한다.
명령형은 정말 신경쓸게 많고 귀찮다.
apply를 하면 객체가 있는지 없는지 확인하고 없으면 생성한다.
여러 개를 만들고 싶으면 경로를 주면 된다.
파일에 변화가 있을때만 업데이트한다.
여러 파일을 한번에 업데이트하고 싶으면 apply 가 유리하다.
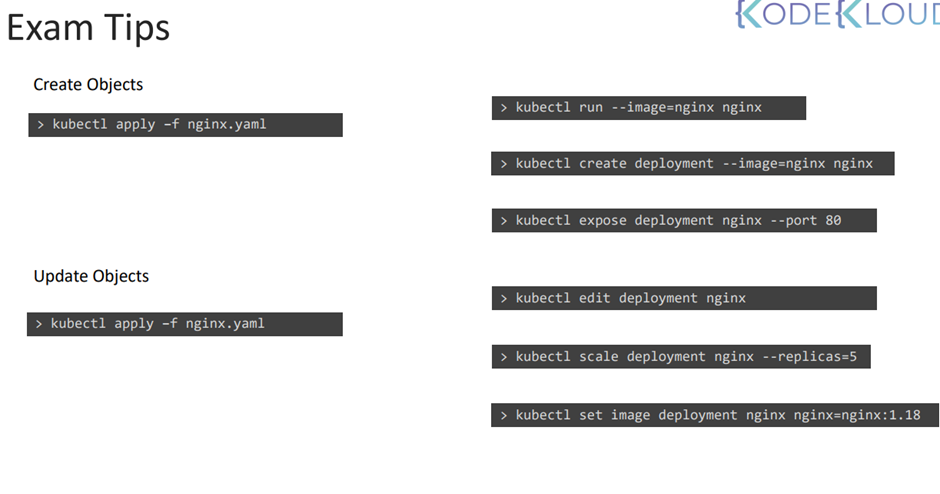
44. Certification Tips - Imperative Commands with Kubectl
While you would be working mostly the declarative way - using definition files, imperative commands can help in getting one time tasks done quickly, as well as generate a definition template easily. This would help save considerable amount of time during your exams.
Before we begin, familiarize with the two options that can come in handy while working with the below commands:
--dry-run: By default as soon as the command is run, the resource will be created. If you simply want to test your command , use the --dry-run=client option. This will not create the resource, instead, tell you whether the resource can be created and if your command is right.
-o yaml: This will output the resource definition in YAML format on screen.
Use the above two in combination to generate a resource definition file quickly, that you can then modify and create resources as required, instead of creating the files from scratch.
POD
Create an NGINX Pod
kubectl run nginx --image=nginx
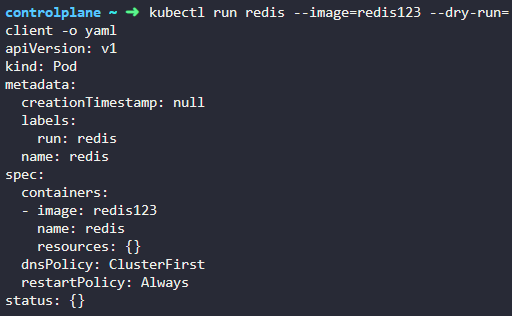
Generate POD Manifest YAML file (-o yaml). Don't create it(--dry-run)
kubectl run nginx --image=nginx --dry-run=client -o yaml
You can then update the YAML file with the replicas or any other field before creating the deployment.
Service
Create a Service named redis-service of type ClusterIP to expose pod redis on port 6379
kubectl expose pod redis --port=6379 --name redis-service --dry-run=client -o yaml
(This will automatically use the pod's labels as selectors)
Or
kubectl create service clusterip redis --tcp=6379:6379 --dry-run=client -o yaml (This will not use the pods labels as selectors, instead it will assume selectors as app=redis. You cannot pass in selectors as an option. So it does not work very well if your pod has a different label set. So generate the file and modify the selectors before creating the service)
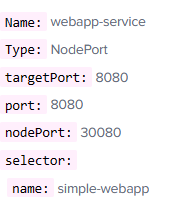
Create a Service named nginx of type NodePort to expose pod nginx's port 80 on port 30080 on the nodes:
kubectl expose pod nginx --type=NodePort --port=80 --name=nginx-service --dry-run=client -o yaml
(This will automatically use the pod's labels as selectors, but you cannot specify the node port. You have to generate a definition file and then add the node port in manually before creating the service with the pod.)
Or
kubectl create service nodeport nginx --tcp=80:80 --node-port=30080 --dry-run=client -o yaml
(This will not use the pods labels as selectors)
Both the above commands have their own challenges. While one of it cannot accept a selector the other cannot accept a node port. I would recommend going with the kubectl expose command. If you need to
specify a node port, generate a definition file using the same command and manually input the nodeport before creating the service.
Deploy a pod named nginx-pod using the nginx:alpine image.
Use imperative commands only.
3.
Deploy a redis pod using the redis:alpine image with the labels set to tier=db.
Either use imperative commands to create the pod with the labels. Or else use imperative commands to generate the pod definition file, then add the labels before creating the pod using the file.
4. Create a service redis-service to expose the redis application within the cluster on port 6379.
Use imperative commands.
Kubectl expose pod redis –port 6379 –name redis-service
도 가능하다.
Expose를 하면 자동으로 clusterIP 서비스로 간다.
5. Create a deployment named webapp using the image kodekloud/webapp-color with 3 replicas.
Try to use imperative commands only. Do not create definition files.
6. Create a new pod called custom-nginx using the nginx image and expose it on container port 8080.
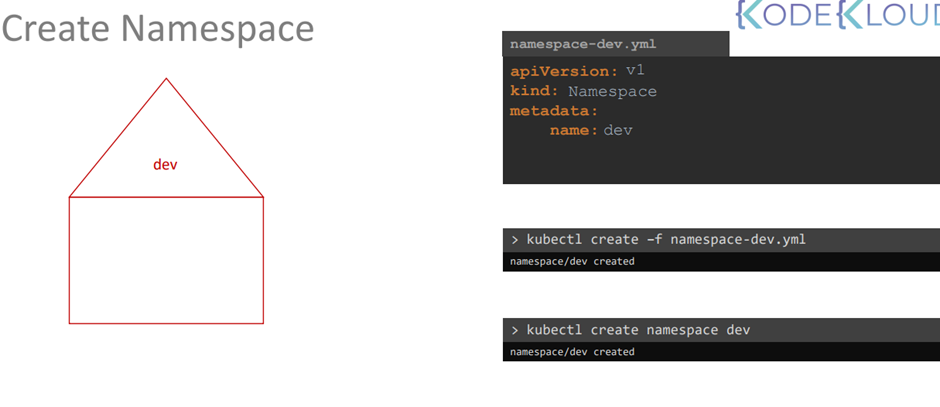
7. Create a new namespace called dev-ns.
Use imperative commands.
8. Create a new deployment called redis-deploy in the dev-ns namespace with the redis image. It should have 2 replicas.
Use imperative commands.
9. Create a pod called httpd using the image httpd:alpine in the default namespace. Next, create a service of type ClusterIP by the same name (httpd). The target port for the service should be 80.
Try to do this with as few steps as possible.
Kubectl run –help 를통해서
expose 명령어를 사용하면 외부로 서비스를 노출시킬 수 있다.
47. Kubectl Apply Command
So when you run the apply command, if the object does not already exist, the object is created.
Apply 를 사용했는데 pod이 없다면 생성한다.
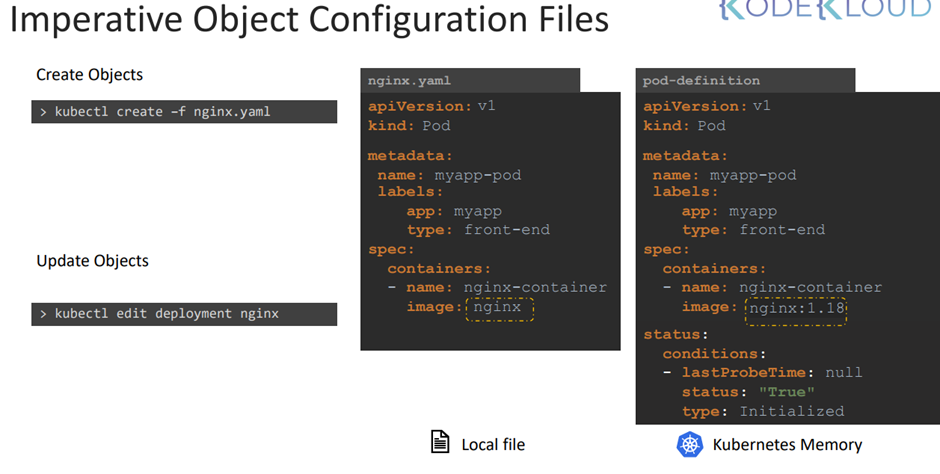
An object configuration similar to what we created locally is created within Kubernetes, but with additional
fields to store status of the object.
객체가 생성되면 kube live object configuration 파일도 생성된다.
status라는 옵션이 추가된다.
This is the life configuration of the object on the Kubernetes cluster.
This is how Kubernetes internally stores information about an object, no matter what approach you use
to create the object.
Yaml 파일은 json 포멧으로 변경된다.
Local yaml 파일, last applied configuration json, live object configuration
Cluster Architecture, API Primitives , Services & Other Network Primitives 에 대해 배워볼 것이다.
10. 자료 다운
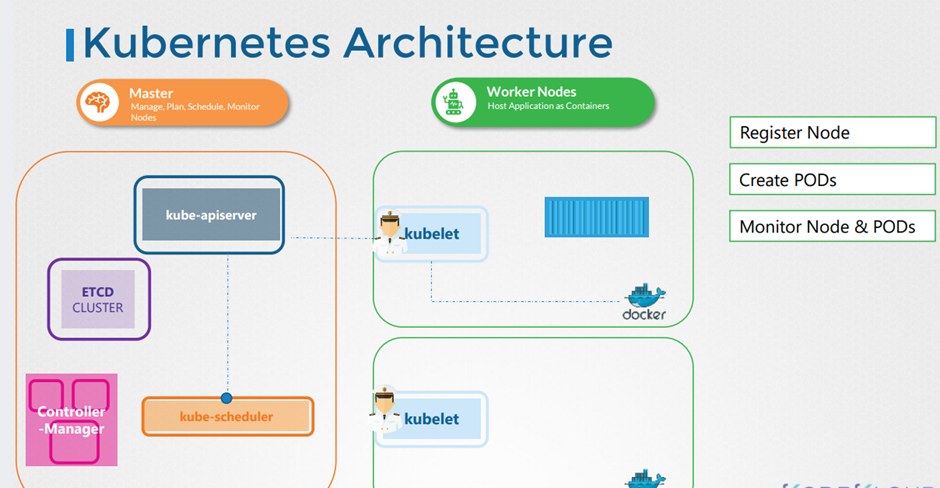
11. Cluster Architecture
이번 챕터에서 위와 같이 배울거다.
쿠버네티스의 목적은 어플리케이션을 다양한 컨테이너에 자동적으로 적재하는 것이다.
화물선과 관제선? 이 있는 것처럼 쿠버네티스에서는 컨테이너를 나르는 Worker Nodes 와 상황을 모니터링 하는 Master Node가 존재한다.
ETCD Cluster.
키-값 형식의 데이터 베이스
다양한 컨테이너에 대한 정보를 가지고 있다.
kube-scheduler
컨테이너에 적재하는 역할
as scheduler identifies the right note to place a container on based on the containers.
Resource requirements the worker nodes capacity or any other policies or constraints such as tents and
여러가지 컨테어너 제약조건에 맞게 적재한다~
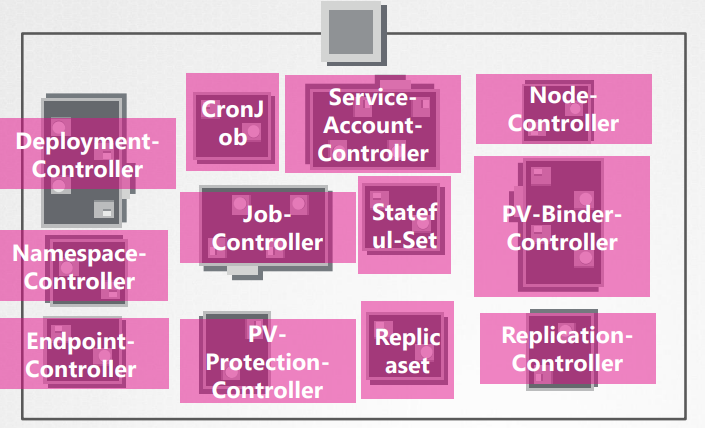
Controller-Manager
그외 문제들을 해결한다,.
kude-apiserver 가 각 클러스터들의 통신을 담당한다.
kubelet 은 각 컨테이너의 선장이라고 보면된다.
컨테이너를 관리하고 kube-apiserver에 통신한다.
kube-proxy service
컨테이너 끼리의 통신은 kube-proxy 서버가 담당한다.
이 구조를 계속 의식하자
we have the ETCD cluster which stores information about the cluster
\we have the Kube scheduler that is responsible for scheduling applications or containers on Nodes
We have different controllers that take care of different functions like the node control, replication,
controller etc..
we have the Kube api server that is responsible for orchestrating all operations within the cluster.
on the worker node.
we have the kubelet that listens for instructions from the Kube-apiserver and manages containers and
the kube-proxy
That helps in enabling communication between services within the cluster.
12. ETCD For Beginners
ETCD 에 대해 알아보자!
It is a distributed, reliable, key value store that is simple, secure and fast.
Key-value store
관계형 데이터베이스와 다르게 키 값 메소드를 사용하여 데이터를 저장하는 비관계형 데이터베이스 유형
put Name "John Doe"
Get Name => "John Doe"
처럼 키를 주면 값이 나온다.
적은 데이터를 값거나 빠른 읽기 빠른 쓰기에 적합하다.
Install ETCD
ETCD 설치하기
2379 포트를 기본으로 사용한다.
기본적은 ETCD control client를 사용한다.
set key1 value1
으로 키 - 값 데이터 하나를 만들고
get key1
으로 value1 을 얻을 수 있다.
13. ETCD in Kubernetes
ETCD 가 쿠버네티스에서 어떻게 돌아가는지 알아보자
ETCD 클러스터에서는
nodes, pods, configs, secrets , accounts, roles, bindings, others 를 포함한다.
Every information you see when you run the kubectl get command is from the ETCD server.
모든 변화를 ETCD serever가 알고 있다. ETCD server가 업데이트 되면 변경사항이 완전히 적용된 것이다.
클러스터를 어떻게 구성하느냐에 따라 ETCD를 다르게 배포된다.
두가지 배포 방식이 존재한다.
about two types of kubernetes deployment. One deployed from scratch and other using kubeadm tool.
Setup - Manual
클러스터를 직접 구축하는 경우 etcd를 수동으로 설치해야한다.
Setup - kubeadm
kubeadm 으로 설치
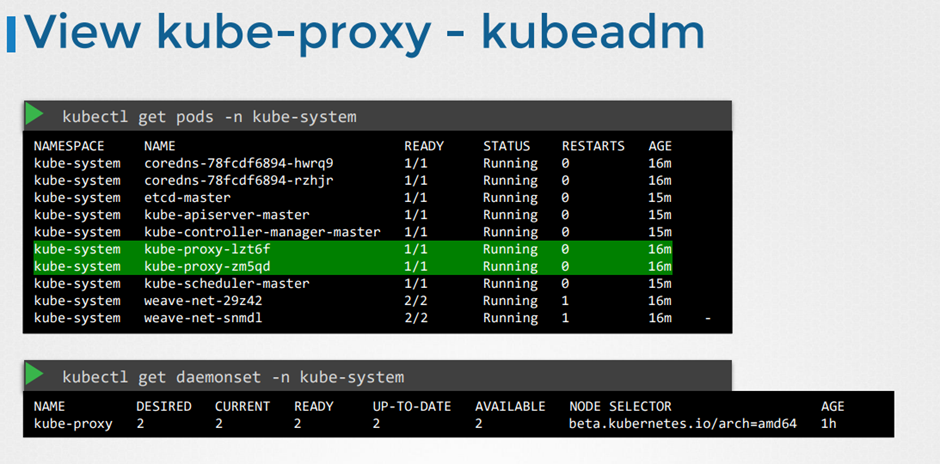
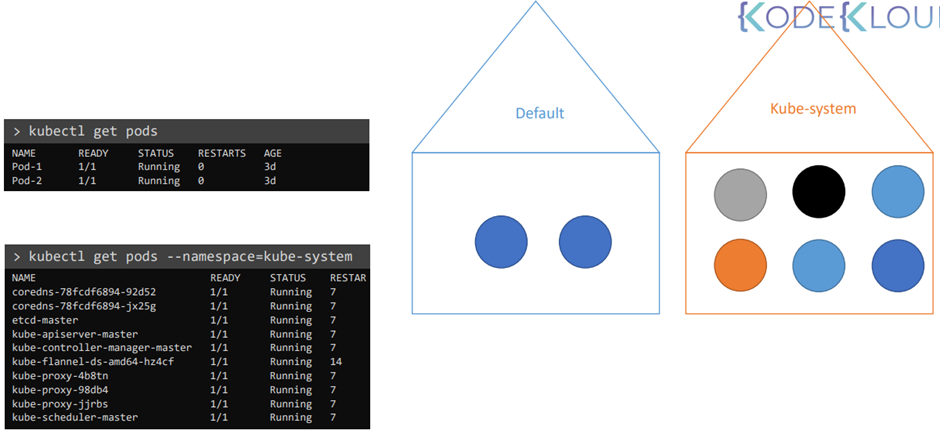
kubectl get pods -n kube-system
If you setup your cluster using kubeadm then kubeadm deploys the ETCD server for you as a POD in
the kube-system namespace.
registry는 루트 경로
각 마스터 노드는 다 ETCD cluster를 갖고 있다. ETCD를 구분할 수 있게해야한다
(? 자료에서는 포트 번호를 다르게 하라고 하는것 같은데...)
14. ETCD - Commands(optional)
(Optional) Additional information about ETCDCTL Utility
ETCDCTL is the CLI tool used to interact with ETCD.
ETCDCTL can interact with ETCD Server using 2 API versions - Version 2 and Version 3. By default its set to use Version 2. Each version has different sets of commands.
For example ETCDCTL version 2 supports the following commands:
etcdctl backup
etcdctl cluster-health
etcdctl mk
etcdctl mkdir
etcdctl set
Whereas the commands are different in version 3
etcdctl snapshot save
etcdctl endpoint health
etcdctl get
etcdctl put
To set the right version of API set the environment variable ETCDCTL_API command
export ETCDCTL_API=3
When API version is not set, it is assumed to be set to version 2. And version 3 commands listed above don't work. When API version is set to version 3, version 2 commands listed above don't work.
Apart from that, you must also specify path to certificate files so that ETCDCTL can authenticate to the ETCD API Server. The certificate files are available in the etcd-master at the following path. We discuss more about certificates in the security section of this course. So don't worry if this looks complex:
--cacert /etc/kubernetes/pki/etcd/ca.crt
--cert /etc/kubernetes/pki/etcd/server.crt
--key /etc/kubernetes/pki/etcd/server.key
So for the commands I showed in the previous video to work you must specify the ETCDCTL API version and path to certificate files. Below is the final form: